Chapter: 1 Fundamentals of Photogrammetry
4-1. Fundamentals of Photogrammetry.
Photogrammetry can be defined as the science and art of determining qualitative and quantitative characteristics of objects from the images recorded on photographs, whether hardcopy film or digital imagery. Objects are identified and qualitatively described by observing photographic image characteristics such as shape, pattern, tone, and texture. Identification of deciduous versus coniferous trees, delineation of geologic landforms, and inventories of existing land use are examples of qualitative observations obtained from photography. The quantitative characteristics of objects such as size, orientation, and position are determined from measured image positions in the image plane of the camera taking the photography. Tree heights, stockpile volumes, topographic maps, and horizontal and vertical coordinates of unknown points are examples of quantitative measurements obtained from photography. The purpose of this section is to review the basic geometry of aerial photography and the elements of photogrammetry that form the foundation of photogrammetric solutions.
Comparisons are also provided between analog, analytical and digital photogrammetry.

- Principles of Photogrammetry. Aerial photogrammetry enables the accurate mapping of 3D coordinates on the ground, using 2D coordinates measured on stereo aerial photographs that see the same points on the ground from two or more different perspectives. Figure 4-1 illustrates how 3D ground coordinates of point P can be determined photogrammetrically from 2D photo coordinates of p1 and p2 measured on a pair of stereo aerial photographs. In this figure, f is the focal length of the camera lens; o1 and o2 show the locations of the focal point of the camera lens when photographs 1 and 2 were taken; x1 and x2 depict the direction of flight at the moment each image was acquired and establish the x-axes on the stereo photographs; y1 and y2 show the cross-flight directions and establish the y-axes on the stereo photographs; and p1 and p2 show the locations where point P is imaged on the two photographs. The photo coordinate system establishes x1 and y1 photo coordinates of point p1 on the left image as well as the x2 and y2 photo coordinates of point p2 on the right image. The main point to remember from this brief summary of photogrammetry is that the light ray projecting from o1 through p1 (inside the camera for the left image) to P (on the ground), and the light ray projecting from o2 through p2 (inside the camera for the right image) to P (on the ground), will never intersect at P (to determine its X/Y/Z coordinates on the ground) unless there is (1) good interior orientation that defines the geometric parameters of the imaging process inside the camera and (2) good exterior orientation that defines the accurate 3D position in the air for the camera lens’ focal point (x/y/z coordinates of points o1 and o2) as well as the accurate angular orientation (roll, pitch and yaw) of the aircraft and camera when each photo or digital image was acquired. Camera calibration establishes the interior orientation parameters for each lens cone of a metric camera, and aerial triangulation (AT) establishes the exterior orientation parameters for each photograph or digital image as well as absolute orientation of all stereo models to fit ground control. A metric camera is constructed so its image characteristics remain stable, i.e., camera calibration parameters do not change over time. Metric cameras must be consistently spatially accurate; they are essential for most photogrammetric projects and are much more expensive than non-metric cameras. Because of broad applications for USACE, this chapter focuses on aerial photogrammetry with cameras pointing in the near-nadir (vertical) direction rather than oblique or horizontal directions.
- Geometry of Aerial Photography. The front nodal point of the camera lens is defined as the exposure station of the photograph (see points o1 and o2 in Figure 4-1). The nodal points are those points in the camera lens system where any light ray entering the lens and passing through the front nodal point will emerge from the rear nodal point travelling parallel to the incident light ray. Therefore, the photograph can be shown on the object side of the camera lens, positioned such that the object point, the image point, and the exposure station all lie on the same straight line. The line through the lens nodal points and perpendicular to the image plane intersects the image plane at the principal point, shown in Figure 4-1 as the origin of the x/y axes on the two images. The distance measured from the rear nodal point to the negative principal point or from the front nodal point to the positive principal point is equal to the focal length (f) of the camera lens.
- Vertical Aerial Photography. Vertical photographs, exposed with the optical axis vertical or as nearly vertical as possible, are the principal kind of photographs used for mapping. If the optical axis is perfectly vertical, the resulting photograph is termed a “truly vertical” photograph. In spite of the precautions taken to maintain the vertical camera axis, small tilts are invariably present; but these tilts are usually less than 1 degree and they rarely exceed 3 degrees. Photographs containing these small, unintentional tilts are called “near vertical” or “tilted” photographs. Many of the equations developed in this chapter are for truly vertical photographs, but for certain work, they may be applied to near vertical photos without serious error. Photogrammetric principles and practices have been developed to account for tilted photographs, and no accuracy whatsoever need be lost in using tilted photographs.
- Photographic scale. The scale of an aerial photograph (photo scale) can be defined as the ratio between an image distance on the photograph and the corresponding horizontal ground distance. Note that if a correct photographic scale ratio is to be computed using this definition, the image distance and the ground distance must be measured in parallel horizontal planes. This condition rarely occurs in practice because the photograph is likely to be tilted and the ground surface is seldom a flat horizontal plane. Therefore, scale will vary throughout the frame of a photograph, and photographic scale can be defined only at a point. Please note that the concept of photographic scale pertains primarily to film imagery because the scale of digital images can be changed at the push of a button. The scale at a point on a truly vertical photograph is given by:
S = f / (H – h)
where:
S = photographic scale at a test point f = camera focal length
H = flying height above datum
h = elevation above datum of the test point
This equation is exact for truly vertical photographs and is also typically used to calculate scale on nearly vertical photographs. In some instances, such as for flight planning calculations, approximate scaled distances are adequate. If all ground points are assumed to lie at an average elevation, an average photographic scale can be adopted for direct measurements of ground distances.
Average scale is calculated by: Savg = f / (H – havg)
where havg is the average ground elevation in the photo. For example, for an approximate horizontal length of a line:
D= (d*(H – havg)) / f
where:
D = horizontal ground distance
d = photograph image distance
The flat terrain assumption, however, introduces scale variation errors. For accurate determinations of horizontal distances and angles, the scale variation caused by elevation differences between points must be accounted for in the photogrammetric solution.
- Horizontal ground coordinates. Horizontal ground distances and angles can be computed using coordinate geometry if the horizontal coordinates of the ground points are known. Horizontal ground coordinates can be calculated by dividing each photo-coordinate by the true photographic scale at the image point. In equation form, the horizontal ground coordinates of any point are given by:
XP = xp (H – hp) / f YP = yp (H – hp) / f
where:
XP,YP = ground coordinates of point P xp, yp = photocoordinates of point p
hP = ground elevation of point P
Note that these equations use a coordinate system defined by the photo-coordinate axes having an origin at the photo principal point and the x-axis typically through the mid-side edge of the photo (i.e., along and in the direction of flight). Then the local ground coordinate axes are placed parallel to the photo-coordinate axes with an origin at the ground principal point. The equations for horizontal ground coordinates are exact for truly vertical photographs and typically used for near vertical photographs. The horizontal distance between points A and B is given by:
??? = �(XA − XB)2 + (YA − YB)2
where:
XA and YA are the ground coordinates of point A and
XB and YB are the ground coordinates of point B
This solution is not an approximation because the effect of scale variation caused by unequal elevations is included in the computation of the ground coordinates. It is important to note, however, that the elevations hA and hB must be known before the horizontal ground coordinates can be computed.
- Relief displacement. Relief displacement is another characteristic of the perspective geometry recorded by an aerial photograph. The displacement of an image point caused by changes in ground elevation is closely related to photographic scale variation. Relief displacement is evaluated when analyzing or planning mosaic or orthophoto projects. Relief displacement is also a tool that can be used in photo interpretation to determine heights of vertical objects. Relief displacement is always along radial lines from the principal point of a truly vertical photograph or the nadir of a tilted photograph. The magnitude of relief displacement is given by the formula:
d = rh / H
where:
d = image displacement
r = radial distance from the principal point to the image point H = flying height above ground
h = ground elevation of image point
Because the image displacement of a vertical object can be measured on the photograph, we can solve for the height of vertical objects:
ht = d (H – hbase) / rtop
where:
ht = vertical height of the object
hbase = elevation at the object base above datum
- Exterior Orientation of Photographs. Unavoidable aircraft tilt causes aerial photographs to be exposed with the camera axis tilted away from vertical. An accurate photogrammetric solution using aerial photographs, whether film or digital images, must account for the camera position and angular orientation at the instant of each exposure. The exterior orientation of a photograph is the spatial position of the focal point and its angular orientation with respect to the ground coordinate system. Six independent parameters (X/Y/Z and ω/φ/κ) are required to define exterior orientation for each photograph’s exposure station. The space position is normally given by three-dimensional X/Y/Z coordinates of the exposure station in a ground coordinate system; the vertical coordinate corresponds to the flying height above datum. Angular orientation is given by the ω/φ/κ orientation about the x, y and z axes in flight, applied sequentially:
ω (omega) is the (roll) rotation about the photograph’s x-axis (direction of flight)
φ (phi) is the (pitch) rotation about the photograph’s y-axis
κ (kappa) is the (yaw) rotation about the photograph’s z-axis
The angular orientation of a truly vertical photograph taken with the flight line in the X-axis direction is: ω=0, φ=0 and κ=0. The omega-phi-kappa angular orientation system is used to express the exterior orientation of a photograph and produce accurate map information from aerial photographs.
- Photographic scale. The scale of an aerial photograph (photo scale) can be defined as the ratio between an image distance on the photograph and the corresponding horizontal ground distance. Note that if a correct photographic scale ratio is to be computed using this definition, the image distance and the ground distance must be measured in parallel horizontal planes. This condition rarely occurs in practice because the photograph is likely to be tilted and the ground surface is seldom a flat horizontal plane. Therefore, scale will vary throughout the frame of a photograph, and photographic scale can be defined only at a point. Please note that the concept of photographic scale pertains primarily to film imagery because the scale of digital images can be changed at the push of a button. The scale at a point on a truly vertical photograph is given by:
- Stereoscopic (Stereo) Photography. Stereoscopic vision determines the distance to an object by intersecting two lines of sight. In the human vision system, the parallactic angle between converging lines of sight associates the observed angle with a distance. Similarly, overlapping aerial photographs can be viewed stereoscopically with the aid of a stereoscope. The stereoscope forces the left eye to view the left photograph and the right eye to view the right photograph. Since the right photograph images the same terrain as the left photograph, but from a different exposure station, the perceived parallactic angles of the two images are visually combined. As the viewer scans the entire overlap area of the two photographs, a continuous stereo model of the ground surface can be seen. The stereo model can be measured in three dimensions, yielding the elevation and horizontal position of unknown points. The limitation that elevation cannot be determined in a single photograph solution is overcome by the use of stereo photography.
- Stereo models. The basic unit of photogrammetric mapping is the stereo model formed in the overlapping ground coverage of successive photographs along a flight line. Along each flight line, the overlap of photographs, termed end lap, is typically designed to be 60 percent. End lap must be at least 55 percent to ensure continuous stereoscopic coverage and provide a minimum triple overlap area where stereo models can be matched together. Between adjacent flight lines, the overlap of strips, termed side lap, is typically designed to be 30 percent. Side lap must be at least 20 percent to ensure continuous stereoscopic
- Neat Models. The neat model is the net area to be mapped within each stereo model. For flight planning and estimating of 9” x 9” aerial photographs, photo coverage and stereo model ground dimensions were traditionally computed by assuming truly vertical photography and flat terrain at average ground elevation. By using average photographic scale, the ground coverage (G) of one side of a square format photograph is:
G = d/Savg
where d is the negative format dimension. The flying height above datum is also found using average scale and average ground elevation.
H = havg + f/Savg
Let B represent the air base between consecutive exposures in the strip. Then from the required photo end lap (E1ap)
B = G (1 – Elap/100)
Let W represent the distance between adjacent flight lines. Then from the required side lap (Slap) W = G (1 – Slap/100)
Match lines between contiguous stereo models pass through the center of the triple overlap area and the center of the side lap area. These match lines bound the neat model area, the net area to be mapped within each stereo model. The neat model has width equal to B and length equal to
W. Note that with modern flight planning software, and aerial digital imagery that has essentially replaced aerial film imagery, such manual computations are no longer performed. Still, it is good to understand the concept of stereo models and neat model areas for further understanding of photogrammetry.
- Parallax equations. The parallax equations may be used for simple stereo analysis of vertical aerial photographs taken from equal flying heights, that is, the camera axes are parallel to one another and perpendicular to the air base. Conjugate image points in the overlap area of two truly vertical aerial photographs may be projected, such that when the photographs are properly oriented with respect to one another, the conjugate image rays recorded by the camera will intersect at the true spatial location of the object point, as shown in Figure 4-1. Photographic parallax is defined as the apparent movement of the image point across the image plane of the camera as the camera exposure station moves along the flight line. The parallax of the image point a: Pa = xa – xa’, where xa and xa’ are coordinate distances on the left and right photographs, respectively. Because parallactic image motion is parallel to the movement of the camera, the parallax coordinate system must be parallel to the direction of flight. All parallax occurs along the x-axis in the axis of flight photo coordinate system. The ya and ya‘ coordinates are equal. Given truly vertical aerial photographs and photo coordinates measured in the axis of flight system, the following parallax equations can be derived:
X = xB / p Y = yB / p
H = H – (f B / p)
where:
X, Y = horizontal ground coordinates
x, y = photo coordinates on the left photograph p = parallax
Note that the origin of the ground coordinate system is at the ground principal point of the left photograph, and the X-axis is parallel to the flight line.
- Parallax difference equation. The parallax equations given above assume that the photographs are truly vertical and exposed from equal flying heights; thus, the camera axes are parallel to one another and perpendicular to the air base. Scale variation and relief displacement are not regarded as errors in the parallax method because these effects are measured as image parallax and used to compute elevations; however, tilted photographs, unequal flying heights, and image distortions seriously affect the accuracy of the parallax method. Absolute elevations are difficult to determine using the parallax equations given above because small errors in parallax will cause large errors in the vertical distance H – h. More precise results are obtained if differences in elevation are determined using the parallax difference formula:
hA = hC + Δp(H – hC)/Pa
where:
hA = elevation of point A above datum hC = elevation of point C above datum Pa = parallax of image point a
Pc = parallax of image point c
∆p = difference in parallax (Pc – Pa)
The formula should be applied to points that are close to one another on the photo format. The differencing technique cancels out the systematic errors affecting the parallax of each point. If C is a vertical control point, the absolute elevation of A can be determined by this method.
- Resection. Except where airborne GPS and Inertial Measurement Units (IMUs) are used for direct georeferencing, resection is the process of recovering the exterior orientation of a single photograph from image measurements of ground control points. In a spatial resection, the image rays from total ground control points (horizontal position and elevation known) are made to resect through the lens nodal point (exposure station) to their image position on the photograph. The resection process forces the photograph to the same spatial position and angular orientation it had when the exposure was taken. The solution requires at least three total control points that do not lie in a straight line, and the interior orientation parameters, focal length, and principal point location. The exterior orientation must be determined from known ground control points by the resection principle except when airborne GPS and IMUs are used for direct georeferencing.
- Intersection. Intersection is the process of photogrammetrically determining the spatial position of ground points by intersecting image rays from two or more photographs (see Figure 4-1). If the interior and exterior orientation parameters of the photographs are known, then conjugate image rays can be projected from the photograph through the lens nodal point (exposure station) to the ground space. Two or more image rays intersecting at a common point will determine the horizontal position and elevation of the point. Map positions of points are determined by the intersection principle from correctly oriented
- Photogrammetric Solution Methods. Correct and accurate photogrammetric solutions must include all interior and exterior orientation parameters. Each orientation parameter must be modeled if the recorded image ray is to be correctly projected and an accurate photogrammetric product obtained. Interior orientation parameters include the camera focal length and the position of the photo principal point. Typically the interior orientation is known from camera calibration. Exterior orientation parameters include the camera position coordinates (X/Y/Z) and the three orientation angles (ω/φ/κ). Typically, the exterior orientation is determined by resection principles as part of the photogrammetric aerotriangulation solution, though a priori values for the X/Y/Z position coordinates of each exposure station are now obtained from airborne GPS data, and the a priori values of the angular orientations (ω/φ/κ) for each exposure are now obtained from IMUs in modern mapping systems. The remaining parameters are the ground coordinates of the point to be mapped. Planimetric and topographic details are mapped by intersecting conjugate image rays from two correctly oriented photographs. Both analytical and digital photogrammetric solution use mathematical models to represent the image rays recorded by the camera. The image ray is assumed to be a straight line through the image point, the exposure station, and the ground point. The following colinearity equation expresses this condition:
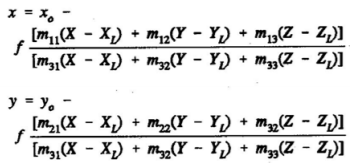 where:
x, y = measured photo coordinates
xo, yo = principal point photo coordinates
mij = nine direction cosines expressing the angular orientation X,Y,Z = ground point coordinates
XL,YL,ZL = exposure station coordinates
These colinearity condition equations include all interior and exterior orientation parameters required to solve the resection and intersection problems accurately. Analytical and digital photogrammetric solutions consist of systems of colinearity equations relating measured image photo coordinates to known and unknown parameters of the photogrammetric problem. The equations are solved simultaneously to determine the unknown parameters. However, because there are usually redundant measurements producing more equations than there are unknowns in the problem, a least squares adjustment is used to estimate the unknown parameters. The least squares adjustment algorithm includes residuals vx and vy on the measured photo coordinates that estimate random measurement error.
- Vertical Aerial Photography. Vertical photographs, exposed with the optical axis vertical or as nearly vertical as possible, are the principal kind of photographs used for mapping. If the optical axis is perfectly vertical, the resulting photograph is termed a “truly vertical” photograph. In spite of the precautions taken to maintain the vertical camera axis, small tilts are invariably present; but these tilts are usually less than 1 degree and they rarely exceed 3 degrees. Photographs containing these small, unintentional tilts are called “near vertical” or “tilted” photographs. Many of the equations developed in this chapter are for truly vertical photographs, but for certain work, they may be applied to near vertical photos without serious error. Photogrammetric principles and practices have been developed to account for tilted photographs, and no accuracy whatsoever need be lost in using tilted photographs.
- Analog Photogrammetry. Analog photogrammetry represents the first era (also called the classical era) of photogrammetry. Either full-scale or reduced-scale film diapositives (positive photographs on a dimensionally-stable transparent medium, film or glass, as opposed to a positive paper print which is not transparent) are used with analog plotters that physically replicate (at reduced scale) the spatial geometry that existed when a strip of overlapping stereo photographs was taken. Aerial triangulation is performed manually with analog plotters and requires a great deal of operator expertise.
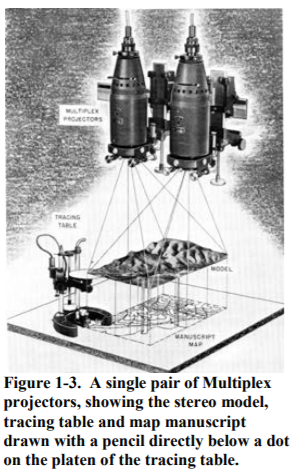
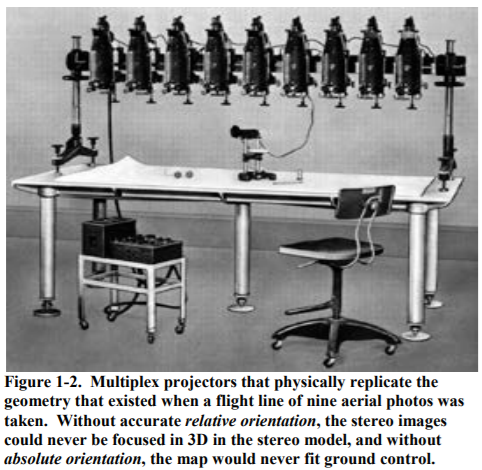 Optical Stereo Plotters. Among direct optical systems, Zeiss Multiplex projectors (Figures 4-2 and 4-3) were widely used in the 1930s and 1940s to include World War The Multiplex used reduced-scale (2”x2”) diapositives produced from the original film negatives (9”x9”). Even- and odd-numbered projectors would project the images through red and blue filters into image space. By using anaglyph glasses (similar to those now used in 3D movies), the operator could see 3D stereo models in this image space by viewing only the red images with one eye and only the blue images with the other eye. To obtain relative orientation, the angular orientation of each projector would be adjusted to replicate the roll, pitch and yaw of each image when originally taken by the camera – an extremely labor-intensive task. Additional labor- intensive steps were taken to obtain absolute orientation to ground control. Furthermore, photo- identifiable features did not come into focus in the stereo model until the platen of the tracing table was at the correct elevation for each feature to be mapped. The platen would be moved up and down as necessary to accurately trace planimetric features on the map manuscript in their correct horizontal locations and to map contour lines with uniform elevations. Other optical plotters were popular in the 1950s, using full-scale 9”x9” diapositives. Although Multiplex plotters are no longer used, these images are still a good way to explain to students how photogrammetry works, whether using analog, analytical or digital procedures.
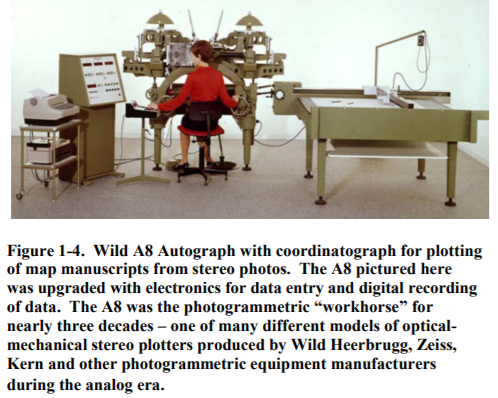 Optical-Mechanical Stereo Plotters. Optical-mechanical stereo plotters were popular through the 1970s. They used metal space rods to simulate the direct optical projection of light rays, e.g., o1 to P and o2 to P in Figure 4-1. Figure 4-4 shows a Wild A8 Autograph with coordinatograph that plots map manuscripts. Full-scale 9”x9” diapositives were carefully mounted in the stages shown at the top of Figure 4-4. Looking through eye pieces, operators could view the left image directly with the left eye and the right image with the right eye, without need for anaglyph glasses. One hand crank moved the space rods (as well as the coordinatograph) in the X-direction, causing a “floating dot” in the eyepiece to appear to move across the image in the direction of flight between the first and second photographs, and the second hand crank did the same in the Y-direction. The foot petal changed the elevation being viewed. When the “floating dot” appeared in focus on the ground (when viewed in stereo), the two space rods were effectively intersecting at the correct elevation (as with point P in Figure 4-1). Contour lines of equal elevation were plotted by moving the two hand cranks to keep the floating dot on the ground while keeping the foot petal unchanged. With most optical-mechanical stereo plotters, the photogrammetric solution was achieved by means of physically altering the positions and rotations of the stages holding the film media relative to each other. Aerial triangulation (AT) processes were very complicated, normally establishing relative orientation only between two images at a time, then cantilevering independent stereo models until photo-identifiable control points enabled absolute orientation of the models. Early systems produced only hardcopy maps while the advent of computers enabled upgraded systems capable of digital data recording. Although more expensive than optical projectors, the optical- mechanical stereo plotters were preferred over direct optical systems because they were more versatile (with later versions modified with encoders for digital recording of coordinates), produced maps of higher accuracy, had better overall stability, and did not need to be operated in dark rooms. Very few optical-mechanical stereo plotters remain in use today in the U.S.
- Analytical Photogrammetry. Analytical photogrammetry, which represents the analytical era of photogrammetry starting in the 1960s, also uses full-scale (9”x9”) film diapositives but mathematically replicates the spatial geometry that existed when strips of overlapping stereo photographs were taken. The analytical era included the development of advanced methods of treating quantitative observations of phenomena affecting the photogrammetric operation, to include atmospheric refraction, for example, where light rays may not be perfectly straight. The metal space rods and linear scales from optical-mechanical plotters were replaced with colinearity equations, computer models and microprocessors for analytical stereo plotters. Most significantly, microprocessors record the 2D photo-coordinates of pass points and tie points on stereo photographs, automate the AT solutions for large blocks of imagery, including multiple flight lines, and compute the 3D ground coordinates of the pass points (that link common points in the overlap areas of two or three images in the same flight line) and tie points (that link common points in the overlap areas of adjoining flight lines).
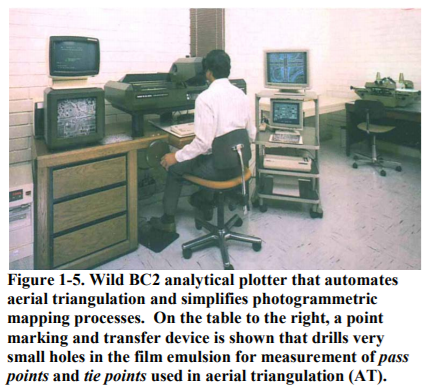 Figure 4-5 shows a Wild Heerbrugg BC2 analytical stereoplotter as well as a point marking and transfer device (far right) that marks tie points and pass points in selected locations so their photo coordinates can be accurately measured with the analytical stereoplotter. Upon successful completion of aerial triangulation, photo control is passed from one photograph to the next as well as to adjoining photographs in overlapping flight lines.
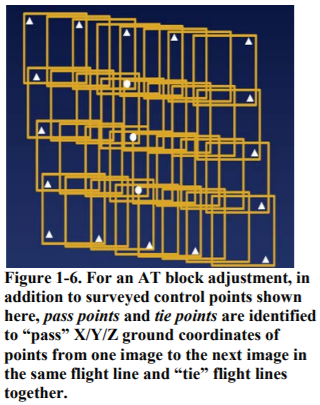 Figure 4-6 shows a small block of eight aerial photos in each of four overlapping flight lines. With 60% forward overlap, it is typical for six to nine pass points to be identified and marked in the overlap areas of each photo, where possible, and those pass points along the edges also serve as tie points for overlapping flight lines. After the AT solution, each photograph has newly established points to control the photogrammetric mapping for each stereo pair. All output is digital for mapping with modern computers and plotters. Analytical plotters are now phasing out because of the greatly diminished use of aerial film photography caused by the modern era of digital metric cameras.
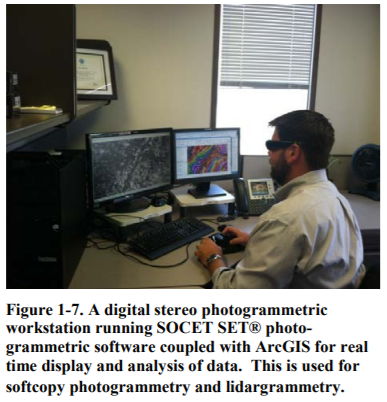 Digital Photogrammetry. Digital photogrammetry, also called softcopy photogrammetry, represents the third and current era of photogrammetry. This era started around 1990 with the introduction of digital stereo photogrammetric workstations and high resolution scanners that converted film into digital imagery. The subsequent introduction of modern digital metric cameras further established softcopy photogrammetry as the dominant technology as film photography became less and less viable, and as major film manufacturers halted production of film for aerial cameras. Charge Couple Devices (CCDs) used in digital cameras have a wider dynamic range, improving the accuracy and appearance of finished products, and digital imagery eliminates processing steps necessary with hardcopy photos. With digital photogrammetry, the costly optical-mechanical stereo plotters have been completely replaced by computers, monitors and software that apply complex photogrammetric concepts and sophisticated image-processing techniques, including automated image correlation that enables thousands of tie points and pass points to be automatically generated rather than manually generated as with analytical photogrammetry. Figure 4-7 shows a digital stereo photogrammetric workstation running software for photogrammetry and lidargrammetry, coupled with GIS software for real time display and analysis. If this looks similar to a typical desktop computer – that’s because it is similar, and that’s the main advantage, i.e., photogrammetric firms now use mass-produced computers with specialized photogrammetric software rather than purchasing expensive specialized hardware required during the analog and analytical eras. Simultaneous AT block adjustments are now performed with over 20,000 digital images per block of images and millions of auto-correlated pass points and tie points, rapidly and accurately providing the six exterior orientation parameters needed for each image (X/Y/Z coordinates of the lens focal point, and roll/pitch/yaw of the camera, when each image was taken). Automatic image correlation also enables the simplified generation of Digital Surface Models (DSMs) and the highly popular digital orthophotos produced by draping unrectified digital aerial imagery over a DSM or DEM. Digital photogrammetric software is also used in lidargrammetry discussed in Chapter 6 of this manual.
Chapter: 2 Project Specifications
4-2. Project Specifications.
Project specifications for aerial image acquisition are changing as a result of the transition from film to digital cameras. Some of the specifications, below, pertain to film cameras, while recognizing that most aerial imagery acquired today for USACE is performed with modern digital cameras for which image quality, resolution, clarity, color balancing and dynamic range are greatly improved and for which operators have far greater flexibility, including the ability to change lenses in-flight. In all cases, specifications herein pertain to metric aerial mapping cameras for which the defining characteristic is that they are stable and perform consistently over long periods of time so that calibration parameters do not change. Whereas the photo scale was the most important parameter for analog and analytical photogrammetric mapping that used hardcopy aerial photos, the pixel size of digital orthophotos and the ground sample distance (GSD) of the raw digital imagery are the most important parameters for digital (softcopy) photogrammetry.
- Contractor Responsibilities. The contractor shall be responsible for operating and maintaining all aircraft used in conformance with all governing Federal Aviation Administration and Civil Aeronautics Board regulations over such aircraft. Any inspection or maintenance of the aircraft resulting in missing favorable weather will not be considered as an excusable cause for delay. The flight crew and cameraman shall have had a minimum of 400 hours experience in flying precise photogrammetric mapping missions. The contractor shall inspect and constantly monitor the image quality and coverage, and shall undertake immediate reflights of areas where coverage does not meet specifications. The reason for any imagery that does not meet the standard specifications shall be noted on the flight log. Rejection of imagery by the contractor or the Contracting Officer shall not in itself be a reason for granting a delay or another photo season. Failure to undertake reflights or delays in forwarding materials for preliminary inspection (if required) that result in a lost season may be reason to invoke default of contract.
- Operational Procedures. Operational procedures and best practices for aerial mapping cameras and aircraft are itemized in this section.
- Aircraft. The aircraft furnished shall be capable of stable performance and shall be equipped with essential navigation and photographic instruments and accessories (e.g., airborne GPS and inertial measurement unit), all of which shall be maintained in operational condition during the period of the contract. No windows shall be interposed between the camera lens system and the terrain, unless high altitude photography is involved. Also, the camera lens system shall not be in the direct path of any exhaust gasses or oil from aircraft engines.
- Aircraft utilization. Total aircraft utilization to, from, between, and over project sites is based on the provisions contained in the contract. For the purposes of estimating aircraft operational time, any day containing two or more consecutive hours of suitable flying conditions, in any sizable portion of the area not yet photographed, will be considered a suitable day for aerial photography. Additional crew costs will accrue during deployment at or near the project site, where applicable. Aircraft and flight crew standby at the home base shall be considered as an overhead expense.
- Emergency aircraft standby. Detailed requirements, conditions, notification procedures, and compensation provisions for emergency dedication of an aircraft to a USACE Command shall be specified. Direct and indirect costs shall be clearly identified in establishing the day rate for such an item.
- Flight line design. The ground distance between adjacent flight lines and the air distance between consecutive exposure stations shall be determined to meet coverage tolerances with respect to the flying altitude above mean ground height (H). For film photography, photo scales for map compilation shall be as stated in the applicable contract section. For digital imaging, modern flight planning software will be used for flight planning in order to acquire imagery with the required ground sample distance (GSD).
- Weather conditions (flying conditions). Unless otherwise specified, aerial photographs shall be taken between the hours of 10 a.m. and 2 p.m., local solar time, on days when well defined images can be obtained. However, modern digital cameras can reduce the traditional effects of shadows and offer greater flexibility in mapping through shadows at different times of the day. Imaging shall not be attempted when the ground is obscured by haze, smoke, dust, or snow or when the clouds or cloud shadows will appear on more than 5 percent of the area of any one photograph without permission of the Contracting Officer or specifically defined differently in the contracted task order scope of work. Photographs shall not contain shadows caused by topographic relief or sun angle, whenever such shadows can be avoided during the time of year the photography must be taken. Any day containing two or more consecutive hours of suitable flying conditions, in any sizable portion of the area not yet photographed, will be considered a suitable day for aerial photography.
- Sun angle. Photographing shall be undertaken when the sun angle is 30 degrees or greater, there is no atmospheric haze, and the lighting and weather conditions are suitable for obtaining acceptable photos. Special care must be taken to minimize shadows in mountainous and canyon areas because shadows on photos are black and contain little or no detail. Exceptions to the stated sun angle requirement may be made if additional shadow detail will enhance ground images or if reflections or hot spots will degrade the aerial imagery.
- Cloud cover. Aerial imagery shall not be obtained during poor weather conditions. Excessive wind conditions that will not permit maintaining the allowable flight line tolerances shall be avoided. Images that contain clouds, haze, or smoke so that critical ground areas are obscured shall be rejected.
- Ground conditions. The season and any special requirements concerning foliage, snow, or other conditions will be specified in the contract. Conditions that might obscure ground detail shall be the responsibility of the contractor. However, if questions or concerns about conditions exist, consultation with the COR before undertaking or continuing the work is advisable. Aerial image acquisition shall be limited to the season specified in the contract unless otherwise authorized by the Contracting Officer.
- Project area coverage. The centers of the first two and last two exposures of each flight line shall fall beyond the project boundaries.
- Flight lines. The minimum area(s) to be imaged will be indicated on maps, shapefiles or KMZ files provided for each image acquisition assignment. The contractor shall design the flight lines to obtain proper side lap to assure full stereoscopic photo coverage. Generally, the flight lines shall be parallel to each other, and outside of consideration for wind direction, align to the longest boundary lines of the area to be photographed. With today’s cameras, automated flight planning software, airborne GPS, and modern avionics, it is relatively easy to acquire digital images at the correct altitudes and with photo centers correctly located for desired forward overlap and sidelap. With film cameras it is important to maintain the desired photo scale; with digital cameras it is important to maintain the desired ground sample distance (GSD).
- Flight height. Departures from specified flight height shall not exceed 2 percent low or 5 percent high for all flight heights up to 12,000 ft. above ground elevation. Above 12,000 ft., departures from specified flight height shall not exceed 2 percent low or 600 ft. high. During inspection for acceptance of film imagery, the flight height can be verified by multiplying the focal length of the camera by the calculated scale of the aerial photos; the photography scale is calculated by dividing the distance between two identifiable points as measured on one of the photographs (as near as possible at the mean ground elevation) by the actual ground distance as measured from the best available map. For modern digital image acquisition, airborne GPS data, when available, provides the easiest and most accurate means for verifying that planned flying heights were achieved.
- Stereoscopic coverage. The entire area of the project must be stereoscopically covered by successive and adjacent overlaps of images within the usable portion of the field of the lens. This is an essential requirement for photomapping work. Lack of acceptable stereoscopic coverage caused by the contractor’s failure to adhere to the specified flight design shall be corrected by reflights at the contractor’s own expense. Lack of acceptable stereoscopic coverage caused by conditions that could not be avoided by the exercise of reasonable diligence and care on the part of the contractor will be corrected by reflights at the Government’s expense, when authorized by the Contracting Officer.
- Camera Requirements. For aerial film photography, a single lens precision aerial mapping camera equipped with a high resolution, distortion free lens shall be used on all assignments. The camera shall function properly at the necessary altitude and under expected environmental conditions. The lens cone shall be so constructed so that the lens and focal plane comprise an integral unit, or are otherwise fixed in a rigid orientation with respect to each Variations of temperature or other conditions shall not cause deviation from the calibrated focal length in excess of ±0.05 mm or preclude determination of the principal point location to within.
- Camera opening. The camera opening in the aircraft shall provide an unobstructed field of view when a camera is mounted with all its parts above the outer structure. The field-of-view shall, so far as practicable, be shielded from air turbulence and any effluents such as gasses and oil. The camera port glass (if required) shall be free of scratches and shall not degrade the resolution or the accuracy of the camera.
- Exposure control. An automatic exposure control device is permitted and recommended for all aerial imaging, but a manual shutter-control capability can be used for some types of terrain to achieve proper exposure.
- Camera Mount. The camera mount shall be regularly serviced and maintained, and shall be insulated against aircraft vibrations.
- Camera Calibration and Tolerances. The aerial camera(s) furnished by the contractor shall have been calibrated within 3 years of award of a contract. The camera calibration certificate shall be presented to the Contracting Officer prior to use of the camera. Although digital cameras have diverse forms of calibration as described in section 4-3c below, film camera features and acceptable tolerances are as follows:
- Focal length. The calibrated focal length of the lens shall be ±3 mm of the nominal length, and measured to the nearest 0.001 mm.
- Lens distortion. The absolute value of radial distortion measured at maximum aperture, as stated in the calibration report, shall not exceed 0.01 mm.
- Lens resolving power. With appropriate filter mounted in-place, the Area Weighted Average Resolution (AWAR) shall be at least 60 lines/millimeter (at maximum aperture) stated on calibration report. The lens shall be fully corrected for color photography.
- Shutter. The camera shall be equipped with a between-the-lens shutter of the variable speed type, whose efficiency shall be at least 70 percent at the fastest rated speed.
- Image quality. The imagery shall be clear and sharp and evenly exposed across the frame. The images shall be free from clouds and cloud shadows, smoke, haze, light streaks, snow, flooding, excessive soil moisture, static marks, shadows, and any other defects that interfere with the intended purpose of the photography. If, in the opinion of the Contracting Officer, the contractor has adhered to specifications and has exercised reasonable care to meet quality requirements, allowance will be made for unavoidable shadows, permanent snow fields, or reflectance from water bodies.
- Image resolution. When there is doubt concerning the resolution of images obtained, a comparison will be made of well-defined edges of manmade structures and other features in the photo with previous imagery that is of acceptable quality, similar scale, and contrast. If the imagery is obviously degraded when compared to previously accepted or acceptable images, the images can be rejected for poor image quality.
- Image clarity. The contractor shall make appropriate measurements to determine edge contrast for photos from several representative photos/images.
- Color balance. Any exposures within the project area with a color balance shift compared to the remainder of the photography will result in unacceptable exposures.
- Dynamic Range. If necessary, exposure level balancing should be applied to extend the contrast levels of digital images to span the entire working range available to the selected bit storage range. Specular reflectors (such as water surfaces) or small, isolated brightness anomalies within a scene shall not be used for determining the maximum or minimum usable contrast range of the digital photos.
- Digital Orthophotos. Project specifications typically might include the following:
- Geographic area to be mapped (normally based on government-provided shapefiles); and verbiage stating approximate square miles total for the area of interest (AOI).
- Pixel size of final orthophotos (e.g., 3”, 6” or 12” pixels), or ground sample distance (GSD) of raw imagery to be collected – note, the pixel size is normally ≥ the GSD;
- Horizontal accuracy (normally RMSExy, RMSEr and/or Accuracyr at 95% confidence level per NSSDA);
- Color bands to be acquired (normally R/G/B for natural color, near infrared, and/or panchromatic); and how the bands are to be delivered, what order the bands are arranged.
- Acquisition window (range of dates for leaf-off or leaf-on conditions); Late spring, early summer, etc.
- Other acquisition conditions (e.g., no clouds, snow, flooding);
- Ground control and/or direct georeferencing requirements (airborne GPS and IMU positioning and orientation);
- GPS base station limitations, if any;
- Data void guidance, if any;
- Digital image format (e.g., GeoTIFF with specified tags and keys);
- Delivery medium (e.g., external hard drive, USB2)
- Digital image tile size (e.g., 1,000 meter grid with no overedge);
- Horizontal datum (e.g., North American Datum of 1983 (NAD83)/HARN adjustment)
- Vertical datum (e.g., North American Vertical Datum of 1988 (NAVD88), using the most recent National Geodetic Survey (NGS)-approved geoid model for conversions from ellipsoid heights to orthometric heights, currently GEOID12A;
- Coordinate system (e.g., UTM or State Plane Coordinate System);
- Units (e.g., meters, or U.S. Survey Feet) – note, never specify “feet” but instead specify U.S. Survey Feet or International Feet;
- Additional image characteristics (e.g., limits on mosaic seamline placement, misalignment, tonal/color balancing, building lean, and image artifacts);
- Accuracy testing and reporting requirements;
- File naming convention;
- Metadata requirements;
- QA/QC procedures;
- Deliverables and due dates;
- Reports to be submitted (e.g., survey report with field work procedures, data acquisition report, AT report, production report, QA/QC report); and Example Scopes of Work (SOWs) for a digital orthophoto project are in Appendix F and Appendix G.
- Planimetric Mapping. In addition to items in 4-2.b above that are not exclusive to digital orthophotos, project specifications include clarification of source materials to be used for planimetric mapping (e.g., TIFF images and final AT solution); scale of hardcopy maps to be produced (if any); and specifications that will enable the development of a data dictionary with collection rules (including topology) for populating a geodatabase with any or all of the following planimetric features to be mapped:
- Paved and unpaved surfaces (e.g., roads; shoulders; driveways; parking lots; concrete pads; alleys; sidewalks; trails)
- Airports (e.g., runways; taxiways; aprons; helipads)
- Railroads (e.g., individual tracks; crossings; roundhouse; abandoned railroad)
- Manmade structures (e.g., buildings >10’x10’; ruins >10’x10’; decks, patios and canopies > 100 ft2; storage tanks; silos; bunkers; foundations >100 ft2; smokestacks; water towers; stairways; below-ground pools; above-ground pools; windmills; turbines; levees)
- Water features (e.g., lakes >4 acres; rivers; streams/creeks >10’ wide; concrete drains; ponds >1/4 acre; reservoirs; ditches; marsh/swamp; beaches
- Water structures (e.g., bridges; dams; piers; breakwaters; walls; small culverts <10’ long; large culverts >10’ long; dikes, revetments, wharfs)
- Barriers (e.g., fences; guard rails; walls; retaining walls; rock walls; breakwaters)
- Utilities (e.g., manholes; catch basins; fire hydrants; water valves; traffic signals; traffic signal poles; light poles; utility poles)
- Disturbed areas (e.g., piles; construction site; quarries; open mines; rock outcrops; boulders; disturbed areas)
- Landmark features (e.g., golf course outlines, greens, tees, sandtraps; public playgrounds; athletic fields; open storage; cemeteries; tennis courts; public parks; public monuments)
- Street hardware (e.g., large overhead signs; billboards; bus stop shelters)
- Vegetation features (e.g., tree outlines; single trees >10’ canopy; single bushes; brush outline; orchards/nurseries; crops)
- An example Scope of Work (SOW) for a planimetric mapping project is in Appendix F.
- Topographic Mapping. In addition to items in 4-2.b above that are not exclusive to digital orthophotos, project specifications include clarification of source materials to be used for topographic mapping from stereo imagery (e.g., TIFF images and final AT solution); map scale and contour interval of hardcopy topographic maps to be produced (if any); clarification of vertical accuracy in vegetated and non-vegetated terrain (e.g., RMSEz and/or Accuracyz at 95% confidence level per NSSDA, and/or equivalent contour interval); guidelines for hydro-flattening (lakes are flat and dual-line streams are level from shore-to-shore) or hydro-enforcement (bridges and culverts are “cut” so that water flows continuously downstream) of a bare-earth DTM or DEM; and specifications that will enable the development of a data dictionary with collection rules (including topology) for populating a geodatabase with any or all of the following topographic features to be mapped:
- Elevation post spacing for gridded DSM and/or bare-earth DTM/DEM
- Breaklines for required feature classes (e.g., closed water body features; linear hydrographic features; coastal shorelines; island features; road features; overpasses and bridges; and low confidence areas where vegetation obscures stereo compilation)
- Contours (e.g., index; intermediate; supplementary; depression; obscured)
Chapter: 3 Aerial Photogrammetric Project Planning
4.3 Aerial Photogrammetric Project Planning.
Regardless of whether an aerial photogrammetry project pertains to digital orthophotos, 2D planimetric map compilation, 3D topographic map compilation, or generation of various geospatial databases produced by aerial photogrammetry, project planning always starts with the deliverables to be produced and dates by which those deliverables are due to the client.
- Review of Project Specifications. Planning is performed after careful review of the project specifications and answering a series of questions: Should maps be compiled to NAD83 (HARN) for the horizontal datum and NAVD88 for the vertical datum? Should elevation data (orthometric heights) be produced by converting from ellipsoid heights using the GEOID12A model? Should the coordinate reference system use the relevant State Plane Coordinate System or Universal Transverse Mercator (UTM) coordinates? Should units be feet or meters? Should Survey Feet or International Feet be used? If digital orthophotos are to be produced, what image resolution is required, i.e., what should be the pixel size and raw image ground sample distance (GSD) from which the pixels are interpolated? What spectral bands and bit depth are required for the imagery? Are there building lean limits that dictate a higher-than-normal forward overlap and sidelap for orthophotos to appear to look nearly straight down? Are there limits on environmental factors such as shadows, clouds, dust, smoke, visible haze, topography, climate, snow cover, standing water, tidal and river levels? If hardcopy maps are to be produced, what are the published map scale and/or contour interval? Whether hardcopy or digital geospatial data are to be delivered, what are the horizontal and/or vertical accuracy standards to be satisfied? What are the metadata requirements? How are accuracies to be reported in the metadata; will the accuracy be reported using the “Tested …” or “Compiled to meet …” criteria specified by the NSSDA?
- Image Resolution. With aerial imagery, there is no such thing as too much clarity. Modern high-resolution digital mapping cameras improve image clarity over film and can capture imagery with GSD as small as a half inch. Advanced 12-bits per pixel data capture provides much higher radiometric resolution (4,096 levels of grayscale vs. 256 levels in standard 8-bit imagery) providing a wider tonal range. This provides better visual detail, especially at the extremes of highlight and shadow. Such images are superior for photogrammetric interpretation and analysis, orthophoto production and general viewing by users. Because of the expanded tonal range, images exposed in less than ideal flying conditions can still provide usable information in marginal light conditions and enable interpretation of features in darker shadows. This capability effectively extends the flying day and flying season for acquisition “windows” when natural sunlight provides adequate illumination for features to be seen on the imagery.
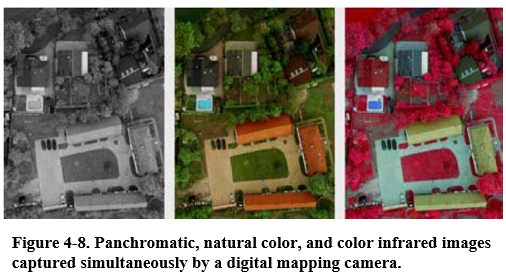 Spectral Bands. With modern digital mapping cameras, multiple image products can be captured in a single flight, whereas film cameras are required to separately load different types of film. Figure 4-8 shows examples of panchromatic (grayscale), natural color (RGB) and color infrared (CIR) images, all acquired from the same digital camera in a single flight.
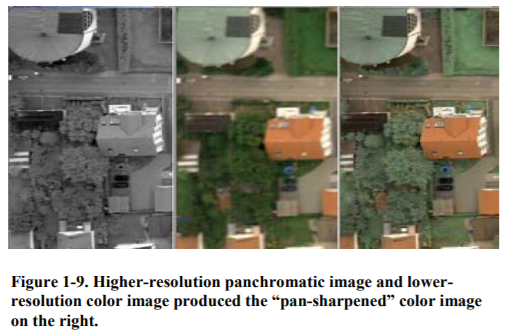 Pan-Sharpened Imagery. In addition to using the three primary image products in their native form, an additional process called “pan-sharpening” can be applied to combine the higher- resolution panchromatic image with the corresponding lower-resolution natural color image to create a new, higher detail color image, as demonstrated with the example at Figure 4-9.
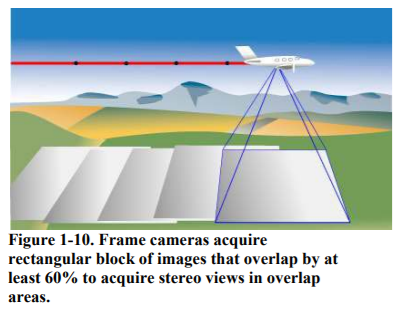 Aerial Cameras. Although film cameras may still be used for small projects, the Government prefers the use of modern, calibrated, digital metric cameras, for reasons cited above. Consistent with principles of stereo photogrammetry (see Figure 4-1), two or more images must be captured that view the terrain from different perspectives. Most airborne mapping cameras are either frame cameras or pushbroom (line scanner) cameras. Digital frame cameras, like film cameras, acquire rectangular blocks of imagery that obtain nadir-looking stereo views by acquiring imagery with at least 60% forward overlap between consecutive images as shown in Figure 4-10.
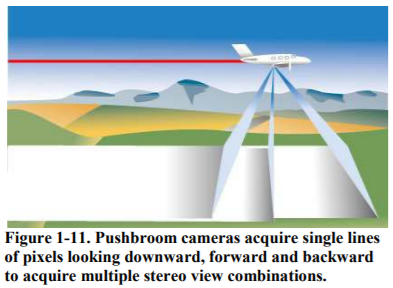
- Pushbroom cameras obtain stereo views by acquiring single lines of pixels that typically scan the terrain with nadir views as well as forward-looking and backward-looking views as shown in Figure 4-11.
- Image Properties. For a thorough explanation of digital image processing, readers are encouraged to read Chapter 5 in the 6th edition of the ASPRS Manual of Photogrammetry or other reference books on digital image processing. Images from digital cameras are superior to scanned film images due to the absence of film grain and the higher radiometric range of digitally sensed pixels. Film supports a dynamic range of about 8 bits per color channel whereas digital sensing routinely offers 12 to 16 bits. Most imagery for USACE is panchromatic or 3- or 4-band multispectral imagery where 3-band (RGB) imagery provides natural color and the 4th band normally provides color-infrared (CIR) images. The ultimate image property, however, is the ground sample distance (GSD). Compared with 6 inch or 12 inch GSD, a GSD of a few inches enables much smaller features to be resolved, however it presents challenges for area coverage, data storage, and data transmission. Once a GSD is chosen, detector element size, system focal length and altitude will be determined by the acquisition firm and should not be specified by the government. On occasions, USACE also has requirements for hyperspectral imagery with dozens or hundreds of different spectral bands, or thermal imagery used for energy audits of installations or other applications where temperature differences need to be mapped. The following sections assume that vertical imagery is required for photogrammetric mapping, but it is fully recognized that USACE may have special requirements for oblique, panoramic, or even terrestrial imagery; but these are beyond the scope of this manual. After the above details are resolved, a determination will be made as to which camera system can best satisfy user requirements.
- Digital Frame Cameras. Digital cameras offer numerous advantages over film-based cameras, to include: superior radiometric resolution; increased accuracy of photogrammetric measurements; reduction of materials and labor costs to produce digital imagery; faster turnaround time from flight to image data; multispectral image acquisition during one flight; electronic forward motion compensation (FMC); clean digital data for better-quality image products (orthophotos); more potential flying days and flying hours per day; completely digital workflow throughout GIS and remote sensing projects. There are numerous small-, medium-, and large-format digital frame cameras used for aerial photogrammetric mapping. This section will review only a few of the most common large-format metric cameras in use today for high- accuracy photogrammetric mapping.
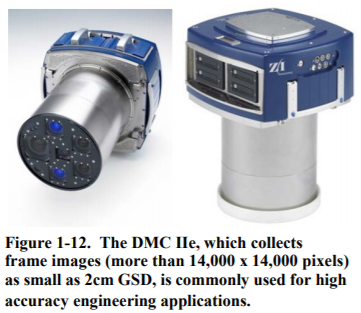 Digital Mapping Camera (DMC). Z/I Imaging’s DMC has a strong customer base and is widely used throughout the U.S., especially for engineering applications. As of 2014, the latest model is the DMC IIe (see Figure 4-12) which includes five camera heads, one large format PAN camera using a single optics and single CCD and four multi-spectral cameras for RGB and NIR. Because of its 1.8 second frame rate and more than 14,000 pixel in flight direction (as well as cross-track), the Z/I DMC IIe can be operated at high airspeeds. For example, the user can collect data with 10cm GSD at 90% forward overlap and 150 knots airspeed. Using fixed wing aircraft, it can collect 3D stereo data from 2cm to 80cm GSD. The Z/I DMC IIe uses four MM30 SD storage modules, each with 1.2 TB capacity for a total storage of 4.8 TB (about 4300 image capacity).
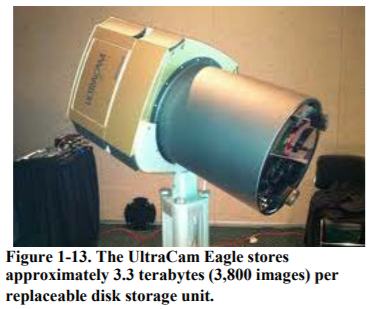 UltraCam. Microsoft has developed numerous large format digital frame cameras in recent years, the latest being the UltraCam Eagle shown at Figure 4-13. The UltraCam Eagle provides panchromatic and four multispectral bands (red/green/blue and near-infrared), supplying panchromatic images with GSD as small as 1.3 inches (3.25 cm) and color images with GSD of 3.8 inches (9.75 cm), acquired from an altitude of 500 meters, with final panchromatic images of 20,010 x 13,080 pixels or color images of 6,670 x 4,360 pixels. Post-processing of UltraCam imagery is performed with UltraMap and UM/AT extension. Photogrammetric production is performed with the customer’s photogrammetric production software or ortho production workflow by GXL Aerial.
- Digital Pushbroom Cameras. Leica’s ADS40/80/100 Airborne Digital Sensors are pushbroom cameras that sense individual lines that look downward, forward and backward, as shown in Figure 4-11. These cameras offer panchromatic and multispectral bands (red/green/ blue and near- infrared), supplying color images with GSD as small as 1.2 inches (3 cm) without pan-sharpening while flying at 120 knots. Compared with the original ADS40 (see Figure 4-14), the newer ADS80 and current ADS100 have improved sensor heads, providing perfectly co-registered image data with equal resolution in panchromatic, color and color-infrared. The ADS40 and ADS80 collect 8 CCD lines with 12,000 pixels each; the ADS100 collects 13 CCD lines with 20,000 pixels each. Leica’s software includes flight planning and evaluation system, flight and sensor control management, advanced inertial position and attitude system, and download and ground processing software. Together, these software systems provide trajectory calculations, georeferencing of each CCD line, and aerial triangulation that includes automatic point measurement and bundle adjustment. Leica’s XPro ground processing software provides extremely fast production of DTMs, digital orthophotos and other image products.
- Camera Calibration. Camera calibration is the process of determining the parameters that describe the precise internal geometrical and optical characteristics of a camera system so that highly accurate photogrammetric mapping and orthophotography can be performed. For example, lens distortion causes a camera lens to fail to image a straight line in object space as a straight line in image space. In Figure 4-1, the lines from o1 to p1 to P and o2 to p2 to P should be straight lines, but those lines aren’t perfectly straight when lens distortion exists. With digital frame cameras, numerous lens distortion coefficients, as well as focal length and principal point coordinates, are parameters determined in a laboratory geometric calibration which models the geometry of a complex camera system which may have multiple camera cones for panchromatic images and/or multiple camera cones for multispectral imagery. With digital line scanners, each panchromatic and multispectral line (forward, backward, and nadir) is calibrated for positioning of each pixel. Geometric and radiometric calibrations are typically performed separately. After the initial factory calibrations, geometric recalibrations should be performed every three years unless there is a major camera rebuild. Radiometric recalibrations are not mandatory on a scheduled basis but should be performed as required to maintain acceptable image quality. For technical details, readers are invited to read a paper by M. Cramer, entitled: “EuroSDR Network on Digital Camera Calibration.”
- Laboratory calibration. From a classical photogrammetric viewpoint, laboratory calibration is the standard method used for analog film cameras, resulting in well-known USGS camera calibration certificates (in the U.S.), typically repeated within specified time intervals. With digital cameras, laboratory geometric and radiometric calibrations are performed by the camera manufacturer when a new camera is delivered or when a digital camera is rebuilt with a new lens or CCD, for example. With digital frame cameras, laboratory geometric calibration certificates provide initial values of the camera calibration parameters (principal point coordinates, focal length, radial distortion, decentering (tangential) distortion, and other distortions) for each camera head, recognizing that large-format digital cameras have numerous panchromatic camera heads and numerous multispectral camera heads, e.g., four panchromatic heads and four multispectral heads for the DMC and UltraCam digital frame cameras. With digital line scanners, laboratory calibration determines the positioning of each pixel for each panchromatic and multispectral CCD line, including forward-looking, backward-looking and nadir lines. For example, the ADS40 and ADS80 cameras have eight CCD lines with 12,000 pixels each, and the ADS100 camera has 13 CCD lines with 20,000 pixels each.
- Field calibration. Laboratory calibration parameters may be subsequently refined with in-flight calibration over test range(s), accounting for the entire camera system including airborne GPS and inertial measurement unit (IMU) that provide direct georeferencing. Experience has shown that digital camera systems can be calibrated at a high accuracy provided that the camera body, lenses, and sensor assemblies have the rigidity required of a metric camera. In addition to laboratory camera calibration, field calibration, including “boresight calibration” of the inertial measurement unit (IMU) orientation angles (roll, pitch and yaw) and “lever arm calibration” of the positional offset between the GPS antenna and the IMU sensor origin, are also required for camera systems that use airborne GPS and IMU sensors for “direct georeferencing.” Regardless of the cameras used, aerial photogrammetric mapping subcontractors must utilize laboratory-calibrated metric cameras with camera calibration certificates that essentially calibrate the location of each pixel on the image. It is up to the practicing professional to establish a field calibration test range where the camera is continually bore-sighted under conditions (including air temperature) similar to that of a specific USACE project. The cost for calibration and other compliance will be borne by the contractor.
- Microsoft UltraCam Calibration. Microsoft uses a 3-step process for calibrating its family of UltraCam cameras, including laboratory calibration, the stitching process, and the self- calibration process which images the same targets from multiple tilt/rotation perspectives. The laboratory calibration is based on a highly redundant set of images from a 3D calibration target with hundreds of points known to ±0.1 mm in X and Y and ±0.2 mm in Z. One calibration dataset for an UltraCamX, for example, consists of nearly 90,000 measured image points used in a least squares bundle adjustment to determine the principal distance (focal length); coordinates of the principal point; specific UltraCam parameters for each CCD position in the focal plane of each camera cone (shift, rotation, scale and perspective skew of each CCD); and traditional radial and tangential lens distortion parameters for each of the eight lens cones. These parameters provide the basic geometric description of each sensor. Within the post-processing of each frame after the download of the raw images of a photo mission, the transformation parameters between layers of a multi lens cone design are computed via a so-called stitching method. This stitching method includes physical parameters of the camera body. The geometric performance of the camera system is improved by introducing self-calibration capabilities into the process of aerial triangulation. After the geometric laboratory calibration the performance of every UltraCam is verified by a specific validation flight over a well-known test area, using high overlap (80% endlap, 60% sidelap) and cross strips that offer a redundant dataset which allows confirmation of the interior geometry of the camera. Automatic tie point matching with aerial triangulation software yields image coordinates of approximate 1 mm accuracy. In summary, Step 1 is the laboratory calibration; after this the camera description is available. Step 2 is the stitching; after every flight every single frame needs to be post-processed, and the stitching is one of the major parts of the post-processing. Step 3 is the validation flight; the validation flight is nothing but a first flight mission done with every camera to prove the functionality, making use of the well know test area with ground truth and the flight pattern with large overlaps.
- Hexagon (Z/I Imaging) Digital Mapping Camera (DMC) Calibration. The DMC is comprised of eight synchronously operating CCD cameras – four parallel multi-spectral cameras and four panchromatic cameras that are slightly tilted and for which the high-resolution images are mosaicked and transformed into one virtual image equivalent to a normal perspective projection. DMC cameras are factory calibrated both geometrically and radiometrically. Similar to the UltraCam, the DMC geometric calibration certificate for each of the eight camera heads provides principal point coordinates, calibrated lens focal length, radial distortion parameters, decentering distortion parameters, and in-plane distortion parameters. Z/I Imaging uses single head calibrations for each of its eight camera heads, followed by platform calibration of all four panchromatic camera heads that produce the virtual image registered to the four multispectral images. For details on how the DMC is calibrated, see Zeitler, W. & Dörstel, C. (2002). Geometric Calibration of the DMC: Method and Results, Proc. ISPRS Com I Symposium, Denver.
- Hexagon (Leica) ADS Camera Calibration. There are currently three types of Airborne Digital Sensors (ADS) in use as line scanners, also called pushbroom scanners. The ADS40 and ADS80 both collect eight CCD lines with 12,000 pixels per line, whereas the ADS100 collects 13 CCD lines with 20,000 pixels per line. The calibration file that accompanies a Leica camera calibration certificate contains calibrated pixel coordinates for each of the 12,000 to 20,000 pixels per CCD line; and the calibration certificate also provides the inertial measurement unit (IMU) misalignment in omega, phi and kappa. The IMU and airborne GPS are essential for line scanner direct georeferencing, an alternative to traditional aerial triangulation with ground control. Leica uses a laboratory calibration followed by self-calibration by bundle adjustment. For details on how ADS cameras are calibrated, see Fuchs, T. & Adiguzel, M., Enhancement & Simplification of Leica ADS Calibration Process.
- Aircraft/Camera Platforms. Aerial acquisition firms have business models that determine which airborne platform is the most cost-effective for specific projects. This section summarizes considerations for alternative airborne platforms, to include single-engine and twin-engine aircraft, helicopters, and unmanned aerial systems (UASs).
- Single-Engine Aircraft. Major advantages of single-engine aircraft for aerial image acquisition are their low costs for initial investment, operation and maintenance. Single-engine aircraft are not allowed to acquire imagery over some cities because there is no back-up should the single engine stall or fail for any reason. Other disadvantages have been their relatively slow rate-of-climb and cruising speeds, low service ceilings and limited space, power and take-off weight to accommodate heavy equipment and crew. In recent decades, single-engine aircraft have been less-used than twin-engine aircraft; but this is changing because modern aerial imaging systems are becoming so automated that aerial image acquisitions can now be performed by a pilot only, without camera operator in some organizations. Furthermore, single- engine aircraft are now available with higher horsepower, higher speeds, and higher service ceilings, e.g., 7600 meter ceiling for the Cessna T210N single turbocharged piston platform.
- Dual-Engine Aircraft. Major advantages of dual-engine aircraft for aerial image acquisition are their higher performance (speed and altitude) and broader area coverage from sensors that perform well at higher altitudes. They may be pressurized for operation at higher altitudes. The larger aircraft offer more space for crews, cameras, and ancillary equipment such as a flight management system (FMS), airborne GPS, inertial measurement unit (IMU) and data storage units. Larger dual-engine aircraft are better suited for multiple sensors (e.g., both imagery and LiDAR) with larger support equipment racks and electric power requirements. Weight, power, and system stability must all be assessed prior to data collection. Major disadvantages include higher costs for initial investment, operation and maintenance of dual- engine aircraft. Potential weather delays will also cost more for a dual-engine aircraft than for a single-engine aircraft when idled; therefore, the potential for weather delays may have a bearing on decisions to use a single- or dual-engine aircraft.
- Helicopters. Major advantages of helicopters for aerial image acquisition are their versatility and agility in quickly changing altitudes and direction of flight to follow meandering roads, streams, levees, beaches, or power lines for corridor mapping or for mapping areas inaccessible for fixed-wing aircraft. Helicopters are often used for engineering applications where very high accuracy is required. Major helicopter disadvantages are much higher operational costs per hour.
- Unmanned Aerial Systems (UASs). Although not yet approved for use in the U.S., Unmanned Aerial Systems (UASs) are becoming increasingly popular in other countries for acquiring imagery of dangerous areas such as war zones or disaster areas where pilot safety could be jeopardized by fixed- or rotary-wing aircraft flying over volcanoes, radiological, chemical, or biological sites for example. They are also popular because they are far less expensive to operate for simple mapping missions. In some cases, UASs with special sensors are superior in searching for fugitives who would otherwise hide from noisy aircraft flying overhead. Cost comparisons with alternative aerial platforms are currently unavailable, but UAVs are expected to become more common for aerial data acquisition in the future.
- Flight Planning. Flight planning is always the responsibility of the aerial acquisition contractor. For much of the 20th century, flight maps were prepared manually using USGS topographic quadrangle maps overlaid with project boundaries, flight lines and estimated photo centers for each photograph to be acquired. As explained in section 4-1b, these flight lines and photo centers required complex computations of photo scale (as a function of camera focal length and flying height); air base (distance between exposure stations of each stereo pair of images); base/height ratios to achieve optimum imagery for selected applications; dimension of ground coverage per photograph (as a function of photo scale); dimensions of “neat models” that can be mapped in stereo from overlapping photographs; sidelap and flight line spacing; endlap and spacing between individual photographs; integer number of flight lines (to include coverage outside the project boundary lines); integer number of photographs for each flight line (to include coverage outside the project boundary), and estimated coordinates of each photo center to be acquired. Today, this flight planning process is automated after entering basic information. Trajectories are planned for each flight line. Furthermore, modern Flight Management Systems (FMS) enable the pilot to fly these trajectories with close tolerance, and modern digital cameras enable exposures to be taken at or near the planned 3D coordinates in the air for each photo center without the highly skilled aerial photographers of the past who looked through viewfinders to determine the aircraft’s approximate location and determine when imaging should commence. Whereas the planned X/Y/Z coordinates of photo centers are now relatively easy to control, and modern cameras have some forms of stabilization, the roll, pitch and yaw of the aircraft still depends upon wind conditions. Regardless of camera(s) to be used, flight planning also includes the assessment of military, DHS and other controlled air space where special permits may be required. Flight planning will vary, depending on the characteristics of the film or digital camera to be used and the acquisition aircraft selected for the project.
- Planning with Aerial Film Cameras. Many photogrammetrists are experienced with the National Map Accuracy Standard (NMAS, 1947) and the ASPRS Accuracy Standards for Large- Scale Maps (ASPRS, 1990) developed for topographic maps with a published map scale and contour interval. With film, photogrammetric procedures have long been developed for camera calibration, photo acquisition, film processing, aerial triangulation, and photogrammetric compilation to achieve specified photo scales, map scales and/or contour intervals. The principal photo acquisition flight planning parameters included flying height above mean terrain (AMT), camera focal length, percent forward overlap and percent sidelap. Although stereo operator expertise was a factor in determining what contour interval could be compiled, map accuracy was predictable and maps were often accepted without the need for independent QA/QC to ensure that accuracy standards are met. For topographic mapping, a lens with 6-inch (152-mm) focal length was standard, although many firms used a lens with longer focal lengths (up to 12- inch) and flew at higher altitudes to produce imagery more suitable for digital. Other than the focal length and flying height, not much else varied in planning for aerial photo acquisition – but the success of a photo acquisition project remained unknown until the film was processed in a photo lab and the imagery was examined to determine if there were any issues. Only then was it known if re-flights were necessary. Even then, faulty optical scanners or faulty scanning procedures sometimes damaged the film, causing the need for re-flights.
- Planning with Aerial Digital Cameras. With digital cameras, it no longer makes sense to specify standard flying heights and other standard acquisition parameters. The principal flight planning parameter changes from photo scale to ground sample distance (GSD) with digital cameras; and the GSD is a function of flying height, lens focal length, and the pixel size of the CCD sensors in the camera. With digital frame cameras, the rules for forward overlap and sidelap are basically the same as film, except that it is much easier to acquire digital images with 80% or even 95% forward overlap for production of near “true orthophotos” in urban canyon areas to minimize building lean. With digital pushbroom cameras looking downward, forward and backward, every point on the ground is imaged three times from different angles, providing imagery with triple overlap everywhere. The major advantage of digital cameras is that the camera operator can view acquired images in flight to determine if correct areas were successfully acquired with cloud-free imagery and determine, in near-real time, whether there is a need to re-acquire selected images. This in-flight review process differs for digital frame cameras like the Digital Mapping Camera (DMC) and UltraCam cameras, or line sensor (pushbroom) cameras like the ADS40, ADS80 or ADS100 airborne digital sensors. With pushbroom cameras, each line scan is totally dependent on airborne GPS (ABGPS) acquisition of X/Y/Z coordinates of the camera lens and inertial measurement unit (IMU) acquisition of roll/pitch/yaw for each line scan for direct georeferencing. Only after processing the digital imagery with auxiliary information (ABGPS and IMU) for direct referencing is it known for sure that pushbroom image acquisition was successful, but this process has become so automated that camera operators can determine in-flight that their acquisitions were successful. With digital cameras, the film magazine is replaced with a ruggedized mass storage unit that stores thousands of digital images for each sortie, subsequently downloaded to different media like removable hard disk drives so that the mass storage unit is quickly ready for the next flight.
- Aircraft Planning. Although single piston engine aircraft are still used for some mapping projects, twin engine aircraft are used for the bulk of airborne remote sensing capture needs today. Twin engine aircraft provide efficient operations for sensors up to 20,000 feet above sea level; they are equipped with power sources to handle a suite of modern digital sensors; they offer workspace and comfort to the pilot and camera operator; and the twin engines provide additional safety in the event a single engine should stall. Maintenance, operation, ferry and collection costs can be quite variable among different twin engine aircraft. For altitudes above 20,000 feet, performance is improved when using turboprop or jet aircraft instead of piston aircraft.
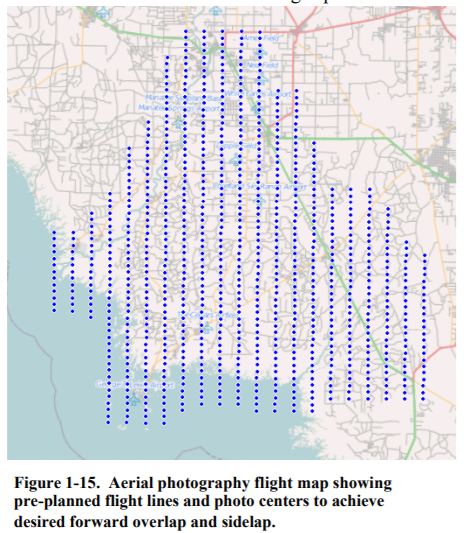 Flight Line Planning. Flight maps should be prepared by the contractor. Such maps are produced pre-flight with planned flight lines and photo centers. Figure 4-15 shows a flight diagram with 21 planned flight lines and photo-center coordinates for images to be acquired. Automated flight planning software computes flight parameters to ensure proper photo scale (or digital image GSD), end lap, side lap, terrain clearance and stereo coverage extending well beyond the project boundaries. With modern Flight Management Systems on acquisition aircraft, and an experienced crew, actual photo center coordinates (in the air) when acquired are often within 1 meter of pre- planned coordinates.
Chapter: 4 Ground Control
4-4. Ground Control.
This section covers ground control requirements for photogrammetric mapping projects so as to establish local accuracy and/or network accuracy. Local accuracy is a value that represents the uncertainty in the coordinates of a data point relative to the coordinates of other directly connected, adjacent data points at the 95% confidence level; local accuracy may be used for stand-alone projects where it is not necessary for the mapping project to fit adjoining projects or a national network. Network accuracy, most commonly used by USACE, is a value that represents the uncertainty in the coordinates of a control point with respect to the geodetic datum at the 95% confidence level. For National Spatial Reference System (NSRS) network accuracy classifications in the United States, the datum is considered to be best expressed by the geodetic values at the Continuously Operating Reference Stations (CORS) supported by the National Geodetic Survey (NGS). By this definition, the network accuracy values at CORS sites are considered to be infinitesimal, that is, to approach zero. It is not necessary to directly connect to a CORS to compute the network accuracy of a control point; however, it is necessary that the survey be properly connected to existing NSRS control points with established network accuracy values.
- Control Survey References. Control surveys associated with USACE projects shall be in compliance with the FGDC Geospatial Positioning Accuracy Standards, Part 4: Standards for Architecture, Engineering, Construction (A/E/C) and Facility Management. The fundamental requirements for control network configuration, point location, and image characteristics are discussed in this EM manual. However, the overview presented is not intended to be used for field survey design or survey procedural instruction. The USACE specification writer or photogrammetric engineer should refer to appropriate survey standards and specifications for guidance in designing the project control surveys. Current standards should be employed. Outdated unrevised standards can provide outdated technology and procedure guidance and cost the Government unnecessary time and money. Listed below are some of the other current (at the time of the publication of this Engineering Manual) publications that may be used.
- FGDC Geospatial Positioning Accuracy Standards, Part 2, Standards for Geodetic Networks, 1998
- EM 1110-1-1002 Survey Markers and Monumentation, September 1990
- EM 1110-1-1003 Navstar Global Positioning System Surveying, February 2011
- NOAA Technical Memorandum NOS NGS-58, Guidelines for Establishing GPS-Derived Ellipsoid Heights (Standards: 2 cm and 5 cm), version 4.3, November 1997
- NOAA Technical Memorandum NOS NGS-59, Guidelines for Establishing GPS-Derived Orthometric Heights, March 200
- ASPRS Positioning Accuracy Standards for Digital Geospatial Data, 2014
- Ground Control Requirements for Photogrammetric Mapping. Field surveying for photogrammetric ground control is generally a two-step process to establish basic and photo control. If ground control is being established for the purpose of orienting stereo models in a stereo photogrammetric workstation, an ASPRS Certified Photogrammetrist shall be involved in planning the basic and photo control requirements for aerial triangulation.
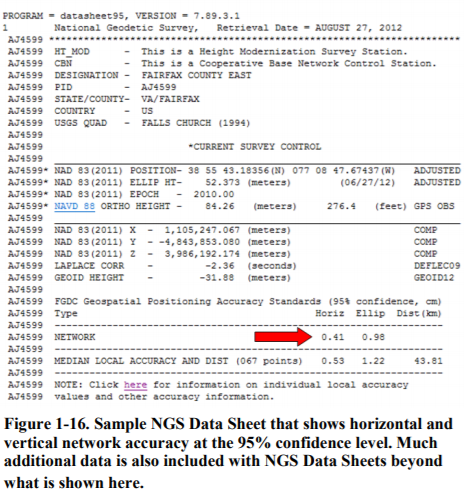 Basic Control. The first step consists of establishing a network of basic control in the project area. This basic control consists of horizontal control monuments and benchmarks of vertical control that will serve as a reference framework for subsequent surveys. The basic control network is normally established using GPS surveys relative to CORS stations, with negligible positional errors, or to control monuments documented with NGS Data Sheet positional accuracy statements. Whereas NGS previously published Orders of Accuracy based on proportional accuracy statements (with orders AA, A and B being the most accurate), since the national adjustment of 2007, NGS has published the accuracy of the horizontal and ellipsoid height components of the National Spatial Reference System (NSRS) as a positional accuracy statement, e.g., 0.41 cm horizontal accuracy at the 95% confidence level per the example at Figure 4-16. Go to http://www.ngs.noaa.gov, then click on Survey Mark Datasheets and/or CORS for a defined search area. If a control network of horizontal control monuments and vertical control benchmarks does not exist, a control network will first need to be established per references cited above. Figure 4-16 shows an example NGS Data Sheet with the red arrow pointing at the horizontal and vertical network accuracy at the 95% confidence level. In addition to data shown here, Data Sheets typically also include additional information such as: State Plane and UTM coordinates; U.S. National Grid spatial address; explanations of how horizontal coordinates, ellipsoid heights and orthometric heights were determined; station description and instructions for finding the monument; station recovery history, etc.
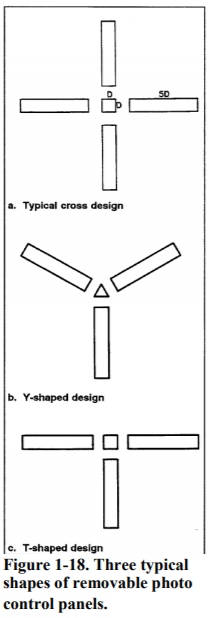
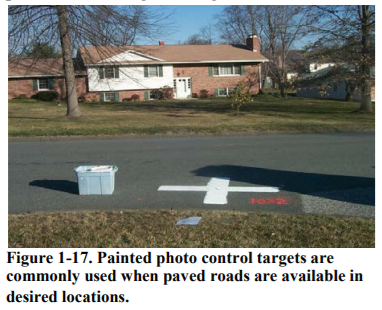 Photo Control. The second step involves establishing photo control by means of surveys originating from the basic control network of higher accuracy. Photo control points are photo- identifiable points that can be observed and measured on the aerial photograph and in a stereo model. Photo control points are the actual points appearing in the images, either pre-marked painted targets (Figure 4-17) or removable panels (Figure 4-18), or photo-identifiable points, as in Figures 4-19 and 4-20, that are surveyed relative to the basic control network and used to control photogrammetric operations.
- Pre-Marked Targets or Panels. Dimensions of painted and removable targets or panels are computed as a function of planned photo scale or digital image resolution so that the targets or panels are visible on the imagery and can be accurately measured. Removable panels are typically constructed from plastic or cardboard with colors that contrast with the surrounding terrain. Such temporary panels are normally used in remote areas where there are no man-made features that can be used or painted on concrete or asphalt. When permanent paint marks are considered unsightly, biodegradable paint can be used that will disappear in time. For planning purposes, care must be taken to ensure removable targets are not disturbed/moved prior to image acquisition, and permission and right of entry must be obtained from the land owner. Pre-marked targets or panels must be established prior to commencement of aerial photography.
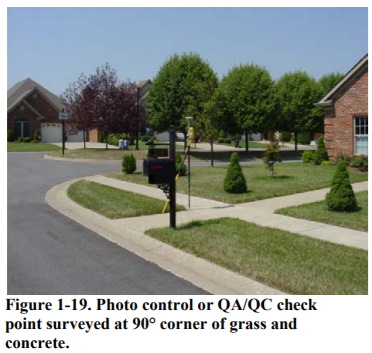
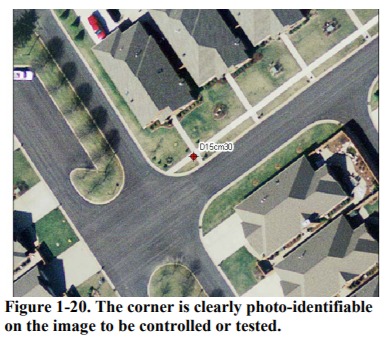 Photo-Identifiable Points. Figures 4-19 and 4-20 illustrate a good example of a point feature that is photo-identifiable at common image resolutions. Figure 4-19 shows how the 90- degree corner between trimmed grass and concrete provides a clear survey point for the GPS tripod and antenna used for photo control surveys; and Figure 4-20 shows how that 90-degree corner appears clearly on an image requiring photo-identifiable control. Photo-identifiable points can be established after commencement of aerial photography, especially if pre-marked targets or panels were obscured or disturbed at time of image acquisition. If not used for photo control, such photo-identifiable points are commonly used as QA/QC check points for accuracy testing.
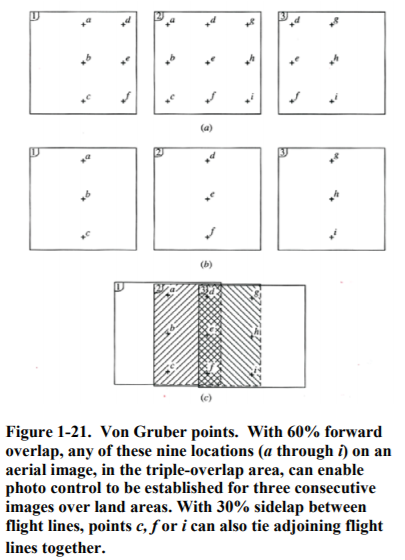 Control Point Location/Distribution. Figure 4-21 shows the location of nine “Von Gruber points” selected in the triple overlap areas of adjoining photographs when airborne GPS is not used to provide control. The number of control points and their optimum locations depend on whether or not direct georeferencing is used from airborne GPS recordings of X/Y/Z coordinates and inertial navigation system (INS) recording of angular orientation angles ω/φ/κ (roll, pitch, and heading) for each image. Prior to the use of direct georeferencing, it was common practice that each stereo pair of images should have three or four horizontal and vertical control points widely spaced in the corners of stereo models to cover overlapping flight lines. However, with modern digital cameras and direct georeferencing systems, as few as four control points may be adequate for an entire block of images in a single aerial triangulation. Automated image correlation of hundreds of tie points and pass points per stereo pair also helps to strengthen the aerial triangulation solution better than in the past when a high number of expensive control points were used. Care should be exercised to ensure that photo control points do not fall in shadowed areas.
- Without Airborne GPS. When airborne GPS control is not used to record the 3D coordinates of the camera lens’ focal point when each image is acquired, then it is common to survey photo control in one of three central “Von Gruber points” (Figure 4-21) in the triple-overlap area in each third stereo model (also see Figure 4-6). In this example, points d, e or f would provide minimum photo control for the first, second and third images. Continuing this sequence, points m, n or o would provide minimum photo control for the fourth, fifth and sixth images. Therefore, there are approximately one-third as many photo control points required as there are images acquired. See the aerial triangulation section, below, for establishment of supplemental photo control (pass points and tie points).
- With Airborne GPS. When airborne GPS is used and integrated into the aerial triangulation, the amount of photo control points can be greatly reduced. Airborne GPS projects require a block of imagery that includes the mapping area. Photo control point configuration for an airborne GPS project should include horizontal and vertical points at defining corners of the block plus selected skeletal horizontal/vertical points selected throughout the block. The amount of additional skeletal primary ground control is based on considerations such as map accuracy, terrain, geoid model in the project area, equipment, and available network control. A Contractor with proven experience should be used for airborne GPS projects. The amount and location of ground control necessary is site dependent. The primary ground control points and airborne GPS points (at photo centers) will all be used in the aerial triangulation solution.
- Photogrammetric Mapping Accuracy Requirements. The accuracy of the basic control network is of higher order than subsequent photo control surveys; however, USACE does not dictate survey control requirements – only the required accuracy of the photogrammetric products as delivered. Nevertheless, the following subsections are from the ASPRS Positioning Accuracy Standards for Digital Geospatial Data that define best practices within ASPRS.
- Accuracy Requirements for Aerial Triangulation. The following is quoted from section 7.7 of the ASPRS Positional Accuracy Standards for Digital Geospatial Data (see Appendix C).“The quality and accuracy of the aerial triangulation (if performed) and/or the Inertial Navigation System –based (INS-based) sensor orientations (if used for direct orientation of the camera) play a key role in determining the final accuracy of imagery derived mapping products. For photogrammetric data sets, the aerial triangulation and/or INS-based direct orientation accuracies must be of higher accuracy than is needed for the final, derived products. For INS-based direct orientation, image orientation angles quality shall be evaluated by comparing check point coordinates read from the imagery (using stereo photogrammetric measurements or other appropriate method) to the coordinates of the check point as determined from higher accuracy source data. Aerial triangulation accuracies shall be evaluated using one of the following methods:”
- By comparing the values of the coordinates of the check points as computed in the aerial triangulation solution to the coordinates of the check points as determined from higher accuracy source data;
- By comparing the values of the coordinates read from the imagery (using stereo photogrammetric measurements or other appropriate method) to the coordinates of the check point as determined from higher accuracy source data.”“For projects providing deliverables that are only required to meet accuracies in x and y (orthoimagery or two-dimensional vector data), aerial triangulation errors in z have a smaller impact on the horizontal error budget than errors in x and y. In such cases, the aerial triangulation requirements for RMSEz can be relaxed. For this reason the standard recognizes two different criteria for aerial triangulation accuracy:”
- Accuracy of aerial triangulation designed for digital planimetric data (orthoimagery and/or digital planimetric map) only:
RMSEx(AT) or RMSEy(AT) = ½ * RMSEx(Map) or RMSEy(Map)RMSEz(AT) = RMSEx(Map) or RMSEy(Map) of orthoimagery“Note: The exact contribution of aerial triangulation errors in z to the overall horizontal error budget for the products depends on ground point location in the image and other factors. The relationship stated here for an RMSEz (AT) of twice the allowable RMSE in x or y is a conservative estimate that accommodates the typical range of common camera geometries and provides allowance for many other factors that impact the horizontal error budget. - Accuracy of aerial triangulation designed for elevation data, or planimetric data (orthoimagery and/or digital planimetric map) and elevation data production:RMSEx(AT), RMSEy(AT) or RMSEz(AT) = ½ * RMSEx(Map), RMSEy(Map) or RMSEz(DEM)”The full ASPRS standards are at Appendix C, for which Annex B, Data Accuracy and Quality Examples, provides practical examples of these AT requirements
- Accuracy of aerial triangulation designed for digital planimetric data (orthoimagery and/or digital planimetric map) only:
- Horizontal Accuracy Requirements for Digital Orthophotos. Different RMSE values may be appropriate for different applications as shown in Table 4-1, extracted from Table 3-4.
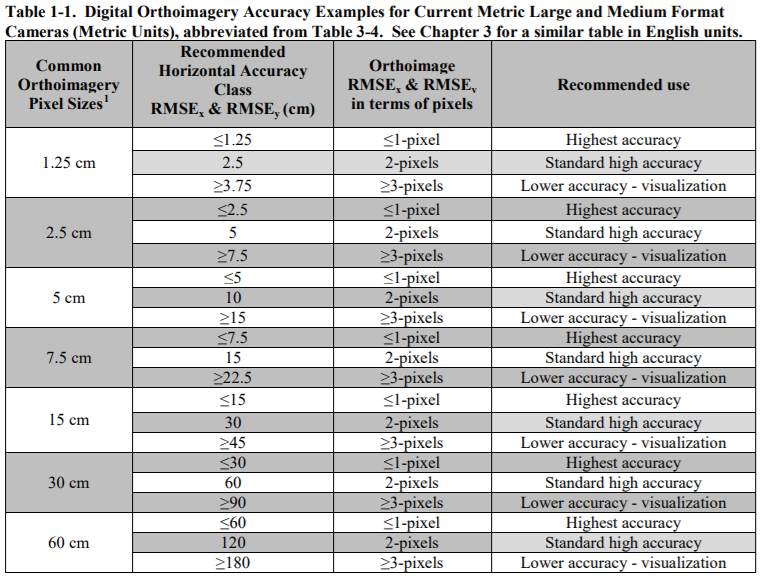
As explained in Chapter 3, horizontal accuracy standards for digital orthophotos could be any horizontal accuracy class for which RMSEx and RMSEy is specified (see Table 4-2).

- Horizontal Accuracy Requirements for Planimetric Maps. Similarly, as explained in Chapter 3, horizontal accuracy standards for digital planimetric maps could be any horizontal accuracy class for which RMSEx and RMSEy is specified (see Table 4-2). However, different RMSE values may be appropriate for different ground sample distances (GSDs) of source imagery and/or for intended map scales, as shown in Table 4-3 below. For standard high accuracy applications, the map scale listed in the Table 4-3 column for ASPRS 1990 Class 1 remains relevant also for the new ASPRS Accuracy Standards for Digital Geospatial Data.
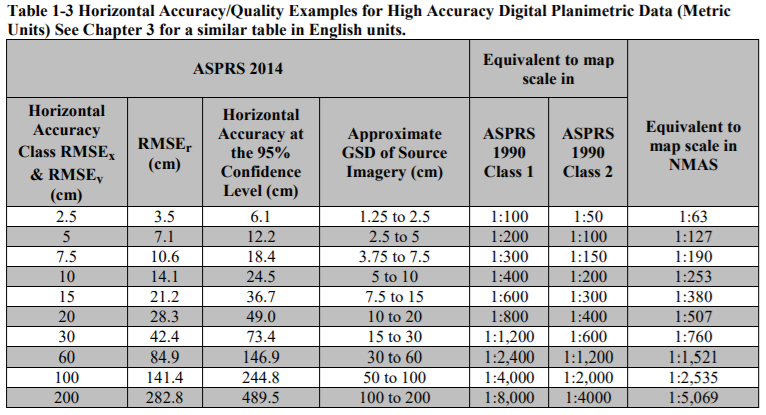
- Elevation Accuracy Requirements for Topographic Maps. Vertical accuracy standards for topographic maps and data could be any vertical accuracy class for which RMSEz is specified (see Table 4-4).

- Table 4-5 specifies primary ASPRS and USACE vertical data accuracy classes applicable to topographic maps or digital topographic data compiled at ten vertical accuracy classes. The last two columns on the right pertain to LiDAR swaths and non-relevant to photogrammetric data.
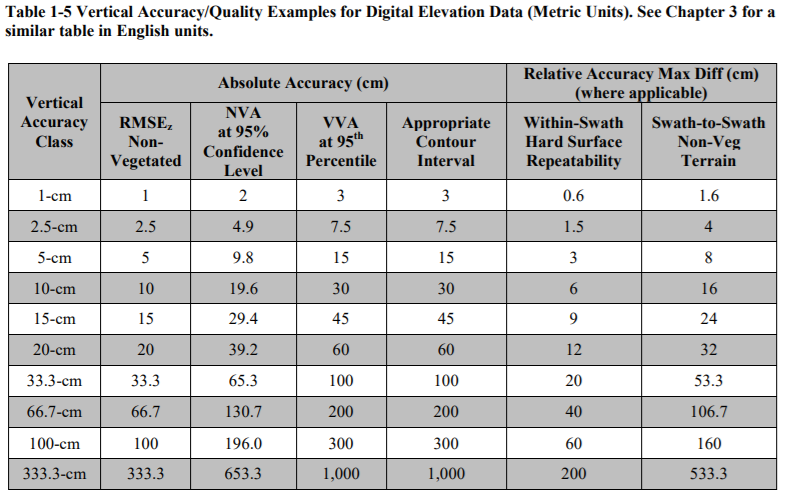
- Accuracy Requirements for Aerial Triangulation. The following is quoted from section 7.7 of the ASPRS Positional Accuracy Standards for Digital Geospatial Data (see Appendix C).“The quality and accuracy of the aerial triangulation (if performed) and/or the Inertial Navigation System –based (INS-based) sensor orientations (if used for direct orientation of the camera) play a key role in determining the final accuracy of imagery derived mapping products. For photogrammetric data sets, the aerial triangulation and/or INS-based direct orientation accuracies must be of higher accuracy than is needed for the final, derived products. For INS-based direct orientation, image orientation angles quality shall be evaluated by comparing check point coordinates read from the imagery (using stereo photogrammetric measurements or other appropriate method) to the coordinates of the check point as determined from higher accuracy source data. Aerial triangulation accuracies shall be evaluated using one of the following methods:”
- Survey Control Planning. In planning for aerial photogrammetric mapping projects, managers must be familiar with FGDC-STD-007.4-2002, Geospatial Positioning Accuracy Standards PART 4: Standards for Architecture, Engineering, Construction (A/E/C) and Facility Management, as well as CHAPTER 3 of this manual, Applications and Accuracy Standards, specifically Table 3-4 or Table 3-5, Orthoimagery Horizontal Accuracy Standards; Table 3-6 or Table 3-7, Planimetric Data Horizontal Accuracy Standards; and Table 3-8 or Table 3-9, Elevation Data Vertical Accuracy Standards. Other references relevant to mapping control include EM 1110-1-1002, Survey Markers and Monumentation; EM 1110-1-1003, Navstar Global Positioning System Surveying; NOAA Technical Memorandum NOS NGS-58, Guidelines for Establishing GPS-Derived Ellipsoid Heights (Standards: 2 cm and 5 cm), version 4.3; and NOAA Technical Memorandum NOS NGS-59, Guidelines for Establishing GPS- Derived Orthometric Heights. These standards and guidelines are relevant to the three forms of mapping control for aerial photogrammetric mapping, i.e., ground control, airborne GPS control, and quality control check points.
- Ground Control Planning. In planning for ground control surveys, several questions need to be answered: Q1: Will airborne GPS be used to record the approximate coordinates of the camera as each exposure is taken? If “yes,” the requirements for basic survey control and photo control will be greatly reduced. Q2: For basic survey control, is there already a network of accurate survey control in the project area that can be used to establish network accuracy for subsequent GPS or conventional ground surveys? See network accuracy reference in sample NGS Data Sheet example at Figure 4-16. Q3: For photo control in areas without existing photo- identifiable point features, are there impervious surfaces around the project area suitable for painted targets (see Figure 4-17), or will removable survey panels (see Figure 4-18) be required to establish photo-identifiable targets in required locations? Q4: For photo control, is the area to be mapped a built-up area with existing photo-identifiable point features throughout the project area that can be surveyed for photo control? See photo identifiable feature examples at Figures 4-19 and 4-20.
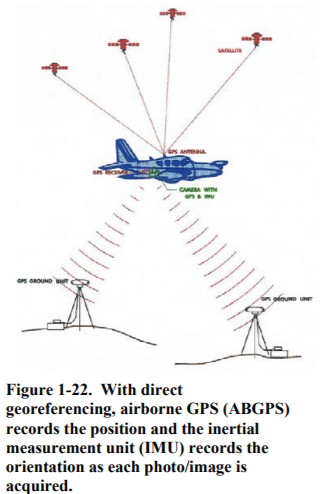 Airborne GPS Control. In most photomapping companies, it is now common to include ABGPS for recording the 3D (X/Y/Z) coordinates of the camera’s focal point, plus an inertial measurement unit (IMU) for recording the roll, pitch and yaw of the camera, when each photo/image is taken (see Figure 4-22). This is called direct georeferencing. When six exterior orientation parameters of each image (X/Y/Z and roll/pitch/yaw) are known, requirements for surveyed ground control are greatly reduced and the aerial triangulation process is simplified. With digital pushbroom cameras (e.g., ADS40/ADS80/ADS100 airborne digital sensors), ABGPS and IMU are mandatory but either or both are recommended for film or digital frame cameras such as the UltraCam or Digital Mapping Camera (DMC). Planning for ABGPS control includes consideration of the project area (size and site access for base stations); flight times and maximum allowable GPS baseline distance between GPS base stations and aircraft; basic photogrammetric and aerial triangulation requirements, including forward overlap between images and sidelap between flight lines; satellite availability during the collection period; location of suitable GPS base stations; location and number of ground GPS receivers required; data collection rate for the receivers; aircraft and ground crew logistics (base stations and aircraft receivers must use the same satellite configuration and limitations); calibration of antenna/ camera “lever arm” offset; ABGPS system cost; and experience of pilot, operator and post-processing personnel. Furthermore, back-up alternatives should be planned for in the event the ABGPS/IMU data are unusable. ABGPS receivers must be capable of tracking both coarse acquisition (C/A) and pseudo range (P-code) data. They must provide dual frequency (L1 and L2) and multi-channel capability with on-the-fly ambiguity resolution and be able to log GPS data at 1-second epochs or better. ABGPS is not necessarily less expensive than obtaining conventional ground control, though it is generally recognized that projects for 1”=100’ mapping with 2 foot contour accuracy or smaller can realize significant savings in time with the use of ABGPS. ABGPS technology usually provides maximum benefit for projects that can be accomplished in larger blocks of photography with multiple flight lines. This technology has been highly successful on USACE mapping projects to date.
- Pre-Marking of Photo Control. Pre-marking of photo control points is recommended for high accuracy mapping. Marking control points with targets before the flight is the most reliable and accurate way to establish photo control points. Appropriate survey points in the basic control network can also be targeted to make them photo-identifiable. When the terrain is relatively featureless, targeting will improve point identification accuracy and reliability; however, pre-marking is also a significant expense in terms of survey hours, purchased materials, and the fact that the targets must be placed and maintained in the field until flying is completed. The target itself should be designed to produce the best possible photo control image by means of a target design that has good color contrast, is symmetrical in shape, can be readily centered over the control point, and is a target size that yields a satisfactory visible image on the resulting imagery.
- Target Location. The optimum location for photo control points is in the triple overlap area of adjoining images (see Figure 4-21, points d, e and f). However, when control is pre- marked, it is difficult to ensure that the target will fall in the center of the triple overlap area when the photography is flown. Care should be taken that targets are not located too near the edge of the strip coverage where the target might fall outside of the model.
- Target Material. Targets may be made of cloth or plastic or may be painted on plywood, fiberboard, or similar sheet material, or on pavement or flat rock outcrops. Flexible targets may be made by assembling pieces of the material to form the pattern, or by printing the pattern on sheet material. Cloth, paint, and other material used for targets should have a non-glossy matte surface. Targets should be held in place by spikes, stakes, small sandbags, or any other means necessary to keep them in position and maintain flatness.
- Target Shape. Targets should be symmetrical in design to aid the photogrammetric operator in finding and measuring the control point. Panels can be developed in X, Y, T and V shapes. The center portion of the panel should be centered over the survey control point, as this is the point at which the image measurements will be made. The legs of the cross-pattern help in identifying the targets on the photos, and also in determining the center of the target indirectly should the image of the center panel turn out to be unclear.
- Target Size. Target sizes should be designed on the basis of intended photo scale so that the target images are the optimum size for finding and measuring on the photos. With digital cameras, the target size is related to the ground sample distance (GSD) or pixel size of the raw imagery. An image size of about five square pixels or less for the central panel is a convenient design value. If the ground dimension of the central panel of the target in Figure 4-18 is D, then the leg width should also be D, the leg length should be about 5D, and the open space between the central panel and each leg should be D. Target sizes are readily calculated once photo scale and optimum target image size are selected. If, for example, a central panel size of 3 pixels is desired, and imagery is to be acquired with a GSD of 10 cm, then D should be 30 cm.
- Target Maintenance. All targets should be maintained in place and protected from (or restored after) damage by man, animals, or weather until photography has been completed. As soon as feasible after photography, each target should be inspected to check whether it has been moved from its proper position or otherwise disturbed in any way; this fact should be reported in the photo control survey report. Damaged or lost targets will require that the photography on which the targets should have appeared to be replaced with a new flight, if the lost targets will jeopardize meeting the accuracy requirement for the photogrammetric product. As an alternative to replacing or relocating lost targets and replacing the deficient photography, it may be permissible (depending on accuracy requirements) to substitute natural features for the lost targets, when acceptable natural objects are present and suitably located to replace lost targets.
- Post-Marking of Photo-Identifiable Control. Post–marking of photo control points after the photography is flown is a method that may be used for lower accuracy mapping. The postmarking method consists of examining the photography after it is flown and choosing natural features in the image that most closely meet the characteristics for horizontal or vertical photo control points (see Figures 4-19 and 4-20 for example). The selected features are then located in the field by reconnaissance and then field surveyed from local basic control monuments. One advantage of postmarking photo control points is that the control point can be chosen in optimum locations at the corners of the stereo models and in the triple overlap areas. The principal disadvantage of postmarking is that the natural feature may not be as well defined as a targeted survey monument either in the field or on the image.
- Ground Control Surveys. Section 4-4a, above, provides the major control survey references. According to FGDC Standards, Part 4, the accuracy of control surveys may be specified as either positional tolerance accuracy or relative closure ratio accuracy, but stating: “Where practical and allowable, positional accuracy standards should be used instead of closure accuracy standards.” The recommended surveying specifications for USACE applications were previously listed in Table 3-27 which establishes positional accuracy standards as a function of RMSE. In all cases Horizontal (radial) accuracy at the 95% confidence level = RMSEr * 1.7308 and Vertical accuracy at the 95% confidence level = RMSEz * 1.9600.
- Conventional Surveys. If GPS-based positional accuracy procedures cannot be used, then the closure standards from the FGDC Standards, Part 4, may be used, as listed in Tables 4-6 and 4-7 for conventional horizontal and elevation surveys.
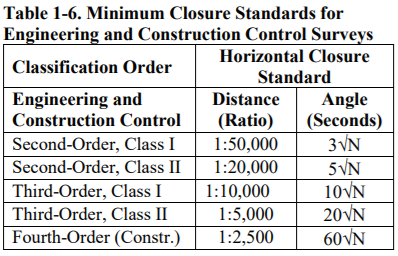
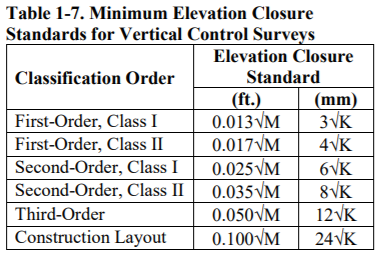
√N = square root of N (number of angle stations)√M = square root of M (distance in miles)√K = square root of K (distance in kilometers) - Survey Report. Unless otherwise modified by the contract specifications, the following materials will be delivered to the Government upon completion of the control surveys:
- General report describing the project and survey procedures used including description of the project area, location, and existing control used; description of the basic and photo control survey network and geometry; description of the survey instruments and field methods used; description of the survey adjustment method and results such as closures and precision of adjusted positions; justification for any survey points omitted from the final adjusted network.
- One set of images showing all control points. The points should be symbolized and named on the image, and the point location coordinates should be included.
- A list of the adjusted coordinates of all horizontal and vertical basic and photo control points.
- Conventional Surveys. If GPS-based positional accuracy procedures cannot be used, then the closure standards from the FGDC Standards, Part 4, may be used, as listed in Tables 4-6 and 4-7 for conventional horizontal and elevation surveys.
- QA/QC Check Point Surveys. Quality Assurance/Quality Control (QA/QC) check points are used to test the horizontal accuracy of digital orthophotos and planimetric data (see RMSEx, RMSEy and RMSEr in Tables 3-4 through 3-7 in Chapter 3) and/or to test the vertical accuracy of elevation data (see RMSEz in Tables 3-8 and 3-9 in Chapter 3). These RMSE statistics arethen used to report the tested horizontal and vertical accuracy of geospatial data consistent with the ASPRS Positional Accuracy Standards for Digital Geospatial Data, i.e., “Tested (meters, feet) horizontal accuracy at 95% confidence level”, “Tested (meters, feet) non-vegetated vertical accuracy (NVA) at 95% confidence level”, and “Tested (meters, feet) vegetated vertical accuracy (VVA) at 95th percentile. Four rules generally pertain to the survey of QA/QC check points: (1) where feasible, the number of check points should be consistent with those recommended by ASPRS in Table 4-8, based on project area; (2) horizontal check points should be point features clearly identifiable on the ground and on the dataset being tested (see Figures 4-19 and 4-20); (3) the survey procedure for horizontal and vertical check points should yield accuracy at least three times better than required of the geospatial product being tested; and (4) the check points should be well distributed with at least 20% of the points located in each quadrant of the mapped area, spaced at interval equal to at least 10% of the map sheet diagonal, if practical to obtain such distribution. QA/QC check points should always be surveyed relative to existing NSRS control points with established network accuracy values.
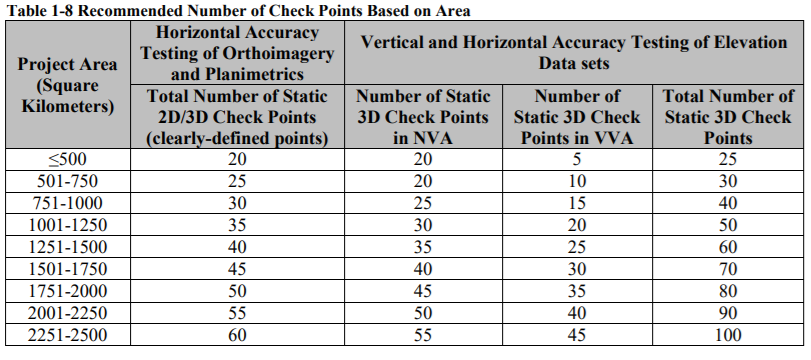
- Coordinate Reference Systems. The coordinate reference system is the backbone of a mapping project. It provides the framework to tie together all field survey and map data. The coordinate reference system must be specified for the final map product. Typically, the State Plane Coordinate System (SPCS) zone or the Universal Transverse Mercator (UTM) zone in which the project is located is used to define a mapping coordinate system. When a discrete project covers more than one zone, it normal to use the single more-predominant SPCS or UTM zone for the overall project area. The North American Datum of 1983 (NAD83) with the latest adjustment of the National Geodetic Survey (NGS), currently NSRS2007, shall be used for the horizontal datum, and the North American Vertical Datum of 1988 (NAVD88) shall be used as the vertical datum for USACE projects within the continental United States unless unique circumstances make the use of these datums unreasonable. The photogrammetric engineer must be familiar with the reference datums, the coordinate system definition, and the methods required for transforming all data into the final map coordinate system. This includes the conversion of ellipsoid heights (from data collected with airborne GPS) to orthometric heights (the correct term for elevation data) by application of the latest geoid model endorsed by NGS. The latest geoid model for the U.S. is GEOID12A. Horizontal and vertical reference datums, geoid model, and coordinate systems used shall be clearly identified as part of the ground control metadata and in specifications for surveying contractors performing photogrammetric ground control data collection.
Chapter: 5 Aerial Image Acquisition
4-5. Aerial Image Acquisition.
Section 4-3 summarizes the major project planning steps for photogrammetric mapping projects to include review of project specifications, image acquisition planning, aircraft and flight line planning, and planning for ground control and/or airborne GPS control. Section 4-4 summarizes ground control survey procedures. Section 4-5 addresses other considerations for successful aerial image acquisition. Before commencement of aerial image acquisition by a subcontractor, the prime contractor shall furnish the Government Contracting Officer, in writing, the name of such subcontractor, for advance approval by the government’s Contracting Officer, together with a statement as to the extent and character of the work to be done under the subcontract, including applicable camera reports/certificates consistent with section 4-3c. Whereas the Government encourages the use of small business enterprises, including woman-owned, minority-owned, disabled veteran-owned, and HUB Zone subcontractors, the prime contractor remains responsible for what its subcontractors do, or fail to do, as part of the prime contract. The aerial acquisition contractor is responsible for operating and maintaining the aircraft used in conformance with all governing Federal Aviation Administration and Civil Aeronautics Board regulations over such aircraft. Any inspection or maintenance of the aircraft resulting in missing favorable weather will not be considered as an excusable cause for delay. The flight crew and camera operator shall have had a minimum of 400 hours experience in flying precise photogrammetric mapping missions. The aerial acquisition contractor shall continuously monitor the image coverage and quality and shall undertake immediate reflights of areas wherein coverage does not meet specifications. Subsequent rejection of imagery by the prime contractor or the Government shall not in itself be a reason for granting a delay for another photo season. Failure to undertake reflights or delays in forwarding imagery for preliminary inspection (if required) that result in a lost season may be reason to invoke default of contract.
- Factors Impacting Acquisition Costs. Many factors impact the costs and overall success of aerial image acquisition.
- Aircraft Utilization. Total aircraft utilization to, from, between, and over project sites is based on the provisions contained in the contract. For the purposes of estimating aircraft operational time, any day containing two or more consecutive hours of suitable flying conditions, in any sizable portion of the area not yet imaged, will be considered a suitable acquisition day.
- Aircraft Standby. Detailed requirements, conditions, notification procedures, and compensation provisions for emergency dedication of an aircraft to a USACE Command shall be specified. Direct and indirect costs shall be clearly identified in establishing the crew-day rate for such an item. USACE does not routinely pay for aircrews idled by common weather conditions that cause flight delays. Typical flight delays need to be factored into the original cost estimation process as discussed below.
- Flying Conditions. Flying conditions must be considered in aerial image flight planning because they influence the amount of flying time, project cost, delivery schedule, quality of imagery, or accuracy of the mapping data. Aerial imaging should not be attempted without permission of the Contracting Officer when the ground is obscured by haze, smoke, snow, vegetation or dust, or when the clouds or cloud shadows will appear on more than 5 percent of the area of any one image.
- Sun Angle. Aerial imaging should normally be undertaken when the sun angle is 30 degrees or greater above the horizon. Special care must be taken to minimize shadows in mountainous and canyon areas because shadows are black or contain reduced detail. The sun angle lessens during the winter to the point where it not only shortens the flying day but it also creates long, dense shadows, especially on wooded north-facing slopes. When the sun angle drops below 30 degrees to the horizon, imaging should normally be terminated. This condition is a problem for only a few days in the southern two-thirds of the country. In the northern third of the conterminous states, this condition could be more restrictive; but during that time frame the northern latitudes could also be snow covered, which would also deter imaging. Exceptions to the stated sun angle may be made with digital cameras with 12-bit image capture that provide superior tonal range and visual detail in shadows. Because of the expanded tonal range, images exposed in less than ideal flying conditions with 12-bit digital imagery can still provide usable information in darker shadows, effectively extending the acquisition window each day. Flight missions from AM to PM collect will place shadows on opposite sides of the structure, so must be discussed.
- Weather Conditions. Aerial imagery should not be acquired during poor weather conditions. Excessive wind conditions that will not permit acquisition within flight line tolerances should be avoided. Assuming otherwise favorable conditions, wind and thermal currents can create sufficient adverse conditions to prohibit a flight that would cause excessive tilt, crab or drift in the imagery. Turbulence is especially troublesome at lower altitudes. Images should be rejected that contain clouds, haze, snow or smoke that obscures critical ground areas. Images should be essentially free of clouds and cloud shadows. In warm weather, even if early morning is clear, clouds usually begin to form before the flying day ends. When a cold front moves through, a period (from a few hours to a few days) of good flying weather tends to follow. In winter, there are cold days when the sky is clear and sharp, sometimes lasting from one to several days. In certain situations, when it is advantageous to have a minimum of shadows, photos may be exposed during overcast conditions. There is usually some haze present near urban areas that can diminish image definition; this urban haze spreads a considerable distance from the source, and the degree of haze tends to rise along with temperature. Again, 12-bit digital imagery helps to identify features imaged during less-than-ideal weather conditions.
- Vegetation Conditions. If the primary purpose of the imagery is to perform topographic mapping, the imagery should be acquired during leaf-off conditions during winter months. If the primary purpose of the imagery is to map the vegetation itself, the imagery should be acquired during leaf-on conditions during summer months. The season and any special requirements concerning foliage, snow or other conditions will be specified in the contract. Conditions that might obscure ground detail shall be the responsibility of the contractor. However, if questions or concerns about conditions exist, consultation with the Contracting Officer or the COR before undertaking or continuing the work is advisable. Aerial image acquisition shall be limited to the season specified in the contract unless otherwise authorized by the Contracting Officer.
- Snow Conditions. Although some snow may be tolerated on aerial imagery, especially thin, spotty patches, snow cover can have several adverse effects on aerial imagery. The surface of the snow causes a high light reflection, creating high-density light flares on the image. Little surface contrast on high-reflective material tends to flatten the terrain image. Depending upon the snow depth, a certain amount of ground cover is obliterated on the image. Snow depth obviously affects the measurement of terrain elevations.
- Site Conditions. Airports, military reservations and other sensitive locations (e.g., nuclear power plants) normally have restrictions on over-flights. These could be total exclusions or restrictions limited to certain time periods.
- Flying Height Restrictions. In order to ensure the safety of both the flight crew and general public, Federal flight regulations decree that an aircraft must not fly lower than that altitude from which the plane can, if it were to lose its power source, glide far enough to clear populated areas. This generally equates to a minimum altitude of 1,000 ft. above the ground. Many areas require aerial image acquisition to be performed with dual-engine aircraft rather than single-engine aircraft that have no back-up. At altitudes in excess of 18,000 ft., because the flight crew is infringing upon the airspace of commercial airways, the pilot must file a flight plan prior to commencing a mission. This may place scheduling restrictions on the photo mission.
- Flight Log. For each flight day, the pilot or camera operator shall prepare a flight log containing the date, project name, aircraft used, and names of crew members. In addition the following shall be prepared for each flight line: altitude, camera serial number, f-stop, shutter speed, beginning and ending exposure numbers and times, and any other comments relevant to the flight conditions. The flight logs shall be delivered to the Contracting Officer as specified in the work order.
- Image Scale/GSD. The flight height above the average elevation of the ground shall be such that the images have an average scale or GSD suitable for attaining required orthophoto pixel size, photogrammetric measurements, map scale, and/or accuracy. Aerial imagery having a departure from the specified scale or GSD of more than 5 percent because of tile, or any changes in the flying height may be rejected.
- Overlap. Unless otherwise directed by the Contracting Officer, the overlap shall be sufficient to provide full stereoscopic coverage of the area to be photographed, as follows:
- Project Boundaries. All of the area appearing on the first and last digital image in each flight line that crosses a project boundary shall be fully outside the project boundary. Each strip of images along a project boundary shall extend over the boundary not less than 15 percent or more than 55 percent of the width of the strip.
- Strip Overlap. Where the ends of strips of images join the ends of other strips, or blocks flown in the same general direction, there shall be a sufficient overlap of the stereoscopic models. If the scales of the imagery are different, they shall be considered at the smaller image scale. In flight lines re-photographed to obtain substitute imagery for any rejected imagery, all images shall be exposed to comply with the original flight specifications, including scale/GSD and overlap requirements. The joining end photos in the replacement flight line shall have complete stereoscopic coverage of the contiguous area on the portion or portions not rejected.
- Shoreline Coverage. Strips running parallel to a shoreline may be repositioned to reduce the proportion of water covered, provided the coverage extends beyond the limit of any land features by at least 10 percent of the strip width.
- End Lap. Unless otherwise specified in the contract, the end lap shall average not less than 57 percent. With modern digital cameras, it is now common for end lap to greatly exceed 60 percent, to include 80 percent end lap for orthophoto projects where building lean must be minimized.
- Side Lap. Unless otherwise specified in the contract, the side lap shall average 25 percent or more.
- Terrain Elevation Variances. When ground heights within the area of overlap vary by more than 10 percent of the flying height, a reasonable variation in the stated overlaps shall be permitted provided that the fore and aft overlap does not fall below 55 percent and the lateral side lap does not fall below 10 percent. In extreme terrain relief where the foregoing overlap conditions are impossible to maintain in straight and parallel flight lines, the gaps created by excessive relief shall be filled by short strips flown between the main flight lines and parallel to them.
- Crab. Any series of two or more consecutive images crabbed in excess of 10 degrees as measured from the mean flight path of the airplane, as indicated by the principal points of the consecutive images, may be considered cause for rejection of the images. Average crab for any flight line shall not exceed 5 degrees. Relative crab in excess of 10 degrees between two successive exposures may be rejected.
- Tilt. Tilt (angular departure of the aerial camera axis from a vertical line at the instant of exposure) in any image of more than 3 degrees, an average tilt of more than 1 degree for the entire project, an average of more than 2 degrees for any 10 consecutive images, or relative tilt between any two successive images exceeding 5 degrees, may be cause for rejection.
- Photo/Image Report. A report shall be included for each aerial image acquisition project giving the following information: camera type and serial number; lens type and serial number; filter type and number; lens aperture setting and shutter speed; date(s) of photography; start and end time for each photo run in local time; frame numbers of all offered photos/images; indicated flying height and computed flying height above sea level; average scale of film imagery or GSD of digital imagery; outside air temperature; weather conditions, clouds, visibility, turbulence; data of image processing; method of image processing; number of frames processed; general comment on quality of imagery; contract number and/or delivery order designation, as applicable; photo numbers, flight line identifications, and index or dates/times of photography.
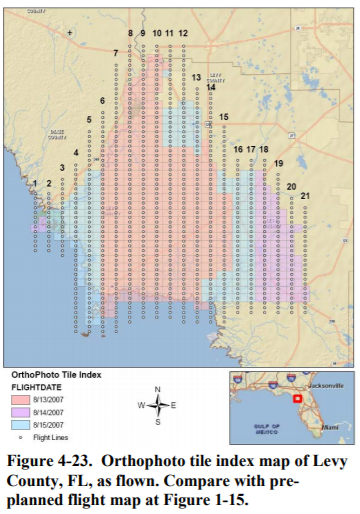 Index Maps. Aerial acquisition firms normally maintain multiple map indices. A spot or point index indicates the center of each aerial image along a flight line. A line index shows the paths or flight lines the airplane flew as it took images. A mosaic index shows all images used to create individual orthophoto tiles or photomosaic. Figure 4-15, above, showed a flight map with pre-planned flight lines and photo centers for Levy County, Florida. Figure 4-23 shows the actual flight lines, photo centers, and orthophoto tile index map of Levy County, following successful image acquisition. It shows individual images that will be used for pre-defined orthophoto tiles. This color-coded index map also shows the three different dates during which the imagery was acquired. The index map at Figure 4-23 enables the client to see how well the acquired numbered flight lines and image centers from airborne GPS compare with the planned flight lines and image centers at Figure 4-15.
Chapter: 6 Aerial Triangulation (AT)
4-6. Aerial Triangulation (AT).
Aerial triangulation (AT), also known as aerotriangulation, is the key to a successful aerial photogrammetric mapping project. AT is the simultaneous space resection and space intersection of thousands of image rays recorded by an aerial mapping camera. These image rays are mathematically modeled as colinearity equations, e.g., equations that model the image rays from o1 through p1 to P and o2 through p2 to P in Figure 4-1 as well as hundreds of other points imaged on each stereo pair of images, while simultaneously modeling lens distortion that slightly warps the rays between P1 and O1 and between P2 and O2 inside the camera, as well as atmospheric refraction that slightly warps the rays between P1 and P and between P2 and P outside the camera. Conjugate image rays projected from two or more overlapping photographs or digital images intersect at common ground points to define the three- dimensional space coordinates of each point. The entire assembly of image rays is fit to known ground control points in a least squares adjustment process, a complex but well-accepted mathematical process based on over-determined solutions, i.e., sets of equations in which there are more known values than unknown values to be solved. When the adjustment is complete, ground coordinates of unknown ground points are determined by the intersection of adjusted image rays, and the six exterior orientation parameters for each image are established, i.e., the 3D position (X/Y/Z coordinates) of the camera lens’ focal point, and the angular orientation (roll, pitch and yaw, referred to mathematically as ω, φ and κ) at the instant that each image was acquired. Other AT concepts were briefly introduced in prior sections. For example, Figure 4-6 shows how pass points and tie points are identified to “pass” X/Y/Z ground coordinates of imaged points from one image to the next in the same flight line and to “tie” adjacent flight lines together, using only a few surveyed control points that are photo-identifiable. Figure 4-22 shows how airborne GPS and an inertial measurement unit (IMU) can directly record the approximate 3D position and angular orientation of each image, as compared with precise 3D position and angular orientation parameters (X/Y/Z and ω/φ/κ) that result from AT. Finally, Figure 4-21 shows how pass points and tie points in the triple overlap areas of digital frame imagery are critical for passing control from one image to the next, and from one flight line to the next.
- AT Objectives. Aerial triangulation has three principal objectives: (1) to determine the six exterior orientation parameters of each image in the block; (2) to determine the 3D ground coordinates of any points measured on those images; and (3) to reduce the amount of field surveying required to achieve objectives (1) and (2). The purpose of aerotriangulation is to extend horizontal and vertical control from relatively few ground survey control points to unknown ground points (pass points and tie points) included in the solution.
- Image Coordinate Measurements. AT first requires the measurement of conjugate points in the overlapping areas of the block imagery (pass points and tie points) and the measurement of the photo coordinates of surveyed control points. With analytical photogrammetry, this requires photo-identification of the control points and the manual selection of pass points and tie points in the nine Von Gruber points of each photo (see Figure 4-21); then point transfer devices are used to drill small holes in the film emulsion of stereo images for these pass points and tie points, followed by the accurate measurement of the photo coordinates of those small holes on each hardcopy photo. With digital (softcopy) photogrammetry, automated image correlation procedures are used for automated identification of pass points and tie points and measurement of their image coordinates; rather than measuring only nine points per image, digital stereo photogrammetric workstations enable the automatic identification and measurement of hundreds of pass points and tie points per image. The least squares AT solution will identify outliers resulting from poor correlation or measurement, still leaving a large number of redundant (over- determined) observations. Over-determination, or redundancy, required for a strong least squares adjustment, occurs because each pass point or tie point has three unknowns (X/Y/Z ground coordinates) but four knowns (x/y image coordinates of each pass point or tie point in the double-overlap areas) or six knowns (x/y image coordinates of each pass point or tie point in triple-overlap areas. By selection and measurement of thousands of pass points and tie points for a large block adjustment, there will be thousands of redundant observations that enable a stronger least squares AT solution.
- Least Squares Adjustment. Least squares adjustments involve a high level of error theory and matrix algebra. A least squares adjustment includes condition equations that describe the relationships among weighted observations and parameters, as well as normal equations that minimize the adjustment residuals’ weighted sum-of-squares and optimize the various parameters. The least squares adjustment process is iterative. AT software forms the colinearity condition equations and solves for all photo orientation and ground point coordinates iteratively until the solution converges. Lastly, the least squares solution also provides good estimates of the accuracy of all adjusted input and output parameters.
- Analysis of AT Adjustment. The least squares adjustment results should be examined to check the consistency of the photo coordinate measurements and the ground control fit. Residuals on the photo coordinates should be examined to see that they are representative of the random error expected from the procedures used to measure them. Residuals should be randomly plus or minus and have a uniform magnitude. Residuals should be checked carefully for outliers and systematic trends. Standard deviation of unit weight computed from the weighted adjusted residuals should not be more than 1.5 times the reference standard deviation used to compute the weights for the adjustment. A large computed reference variance indicates inflated residuals and possible systematic errors affecting the adjustment. For example, if photo coordinates were judged to have an overall measurement standard deviation of 0.005 mm and this value was used to compute observation weights, the standard deviation of unit weight computed by the adjustment should not exceed 0.0075 mm.
Chapter: 7 Digital Photogrammetric Mapping Workflow
4-7. Digital Photogrammetric Mapping Workflow.
- Using Digital Imagery. In order to bring the various photogrammetric mapping procedures together in a logical sequence, Figures 4-24a and 4-24b illustrate a typical large scale photogrammetric and orthophoto production workflow. Orthophoto production is typically part of a standard photogrammetric project and utilizes much of the same information collected for photogrammetric mapping to include aerial photography, ground control, aerial triangulation and digital terrain model development. However, when only orthophotos are required for a project, the amount of digital elevation model collection can be greatly reduced as well as the need for larger amounts of vertical control. The end user should be aware that a digital elevation model developed ONLY for orthophoto production will not be suitable for contour generation.
- Workflow through AT. Figure 4-24 diagrams the workflow up through the AT process. The ground control and/or check points are surveyed and quality controlled (QC’d) along with the field notes. The aerial imagery is acquired and the raw imagery is QC’d. If airborne GPS and IMU data were acquired, the data are processed and QC’d to establish preliminary exterior orientation parameters (X/Y/Z and ω/φ/κ) for each individual image. The raw imagery is then processed into its final form required for AT; such image processing is especially critical for ADS40/80 imagery where Level 0 raw imagery must be converted into Level 1 rectified image strips. AT steps are then completed using software best suited for frame or pushbroom cameras.


- Workflow after AT. Figure 4-25 diagrams the workflow after completion of AT. Once the AT is complete, photogrammetrists know the six exterior orientation parameters for each image so that stereo models can be set up in digital stereo photogrammetric workstations. This enables all photogrammetric operations to proceed. Planimetric features can be stereo-compiled, and digital elevation models (DEMs) and digital orthophotos can be produced. All products are QC’d. Metadata are also produced and QC’d. Any product that fails a QC review must be corrected. Before final delivery to USACE, all deliverables typically receive a comprehensive and separate final quality assurance (QA) review and validation prior to delivery.
- Stereo Feature Compilation and Map Finishing. Once a valid AT solution is produced, the solution along with the camera calibration information and the raw (un-rectified) imagery can be imported into software capable of displaying the imagery in a stereoscopic (3D) environment. Stereographic software allows analysts to accurately compile features visible in the imagery with X, Y, and Z (elevation) coordinates. Each vertex of a polygon, line or individual point will hold this spatial information. Stereoscopic viewing allows the analysts to accurately measure elevation and heights of objects. Stereo imagery is also beneficial for photo interpretation projects that do not require an elevation value associated with the line work. Stereo imagery can assist the photo interpreter with identifying vegetation types by relying on the height of the feature such as identifying a tree versus a shrub or distinguishing taller cattail from shorter sedges.
- Stereo Compilation of DSMs and DTMs. Similar to feature compilation above, once all valid parameters are loaded into stereoscopic viewing software, topographic features can be collected with elevation values. Creating a digital surface model (DSM) or a digital terrain model (DTM) requires the collection of topographic breaklines, i.e., linear features that describe a change in the smoothness or continuity of a surface. For example, soft breaklines ensure that known z-values are maintained along a linear feature such as a road centerline, drainage ditch, or pipeline; and hard breaklines define streams, shorelines, dams, ridges, building footprints, and other locations with abrupt surface changes. Mass points, which are individual 3D points, are also stereoscopically placed on the ground equal distances apart where topographic breaklines do not exist. Mass points are commonly generated by a process called Semi-Global Matching (SGM) based on automated image correlation techniques. The placement of mass points will vary depending on the required contour interval when contours are to be produced. The difference between a DSM and a DTM is that the DSM represents the top reflective surface including vegetation, bridges and buildings as well as the topographic breaklines and mass points. A DTM is a bare-earth model where all surface objects have been removed leaving only the ground terrain. Typically, only topographic breaklines and mass points are collected to create a DTM. Once the area of interest has topographic breaklines and mass points, the data can then be ingested into GIS software which can produce a TIN (Triangular Irregular Network). This TIN is essentially a ground based elevation model that was computed by interpolating values between the known elevations of the breaklines and mass points. Contours can then be created from the TIN file and viewed in the stereo software. Viewing the contours on the imagery in stereo allows the analyst to see where additional breaklines or mass points may be needed, i.e. if the contours are floating or cutting into the side of a hill. With modern softcopy photogrammetry, contour lines are no longer compiled manually by moving a floating dot along the ground at set elevations.
- Digital Orthophoto Production. Orthophotography, images that have been rectified (pixel by pixel) and positioned spatially to the earth’s surface, are produced using specialized software. The orthophoto software uses the camera calibration file, AT solution, digital elevation files and the raw photography to produce the orthophotos. After individual orthophotos have been created they can be mosaicked into one seamless image or several combined images based on square tile grids (USGS Quad/Quarter Quad boundaries, or user specified dimensions). Orthorectified images should be QC’d to ensure they are free of voids, sensor artifacts and warped features. Warped features are typically caused by either an error in the elevation model or by bridges being rectified to a bare earth model. File size should be considered when producing orthorectified imagery and mosaics. The finer the resolution the higher the file size will be. It is not uncommon for one uncompressed single frame image to be larger than 1GB.
- Geodatabase. A Geodatabase is a database which stores spatial data that can be viewed and modified using GIS software. Geodatabases can have several layers of data within them, the first being a Dataset. Datasets hold the defined projection of the feature classes that reside within them. Feature classes can include line, polygon, point or multi point geometry types. Each geometry type requires a unique feature class; however there can be hundreds of thousands of features within one feature class. Those features can also have unique attribution. Elevation data and imagery can also be stored in Geodatabases along with vector data. The specific types and functions of the database depend on the software used to develop the database.
- Workflow through AT. Figure 4-24 diagrams the workflow up through the AT process. The ground control and/or check points are surveyed and quality controlled (QC’d) along with the field notes. The aerial imagery is acquired and the raw imagery is QC’d. If airborne GPS and IMU data were acquired, the data are processed and QC’d to establish preliminary exterior orientation parameters (X/Y/Z and ω/φ/κ) for each individual image. The raw imagery is then processed into its final form required for AT; such image processing is especially critical for ADS40/80 imagery where Level 0 raw imagery must be converted into Level 1 rectified image strips. AT steps are then completed using software best suited for frame or pushbroom cameras.
- Using Film Imagery. Film imagery can also be used in a digital photogrammetric mapping workflow by scanning film positives with a high-resolution scanner to convert the film into a digital format. The ground pixel size is a function of the photo scale and scanning resolution. The photo scale is a function of the focal length of the camera and the flying height above the terrain. For example, when using a 6-inch (0.5 foot) focal length camera and flying at 3,000 feet above mean terrain, the photo scale would be 1:6,000. The scanning resolution is commonly identified by dots per inch (dpi), e.g., 1,000 dpi. For this example, the ground pixel size in feet = 6,000/1,000/12 = 0.5 ft. per pixel, and the ground pixel size in meters = 6,000/1,000/39.37 = 0.1524 meters or 15.24 cm. These formulas apply because dpi was used for the scanning resolution, and there are 12 inches per foot and 39.37 inches per meter. Similar formulas exist when the scanning resolution is in microns (10-6 meters). A common scan resolution of 15 microns equates to 1,693 dpi, and the highest resolution scan is around 7.5 microns which equates to 3,386 dpi.

 where:
 Optical Stereo Plotters.
 Figure 4-5 shows a Wild Heerbrugg BC2 analytical stereoplotter as well as a point marking and transfer device (far right) that marks tie points and pass points in selected locations so their photo coordinates can be accurately measured with the analytical stereoplotter. Upon successful completion of aerial triangulation, photo control is passed from one photograph to the next as well as to adjoining photographs in overlapping flight lines.
 Figure 4-6 shows a small block of eight aerial photos in each of four overlapping flight lines. With 60% forward overlap, it is typical for six to nine pass points to be identified and marked in the overlap areas of each photo, where possible, and those pass points along the edges also serve as tie points for overlapping flight lines. After the AT solution, each photograph has newly established points to control the photogrammetric mapping for each stereo pair. All output is digital for mapping with modern computers and plotters. Analytical plotters are now phasing out because of the greatly diminished use of aerial film photography caused by the modern era of digital metric cameras.
 Digital Photogrammetry. Digital photogrammetry, also called softcopy photogrammetry, represents the third and current era of photogrammetry. This era started around 1990 with the introduction of digital stereo photogrammetric workstations and high resolution scanners that converted film into digital imagery. The subsequent introduction of modern digital metric cameras further established softcopy photogrammetry as the dominant technology as film photography became less and less viable, and as major film manufacturers halted production of film for aerial cameras. Charge Couple Devices (CCDs) used in digital cameras have a wider dynamic range, improving the accuracy and appearance of finished products, and digital imagery eliminates processing steps necessary with hardcopy photos. With digital photogrammetry, the costly optical-mechanical stereo plotters have been completely replaced by computers, monitors and software that apply complex photogrammetric concepts and sophisticated image-processing techniques, including automated image correlation that enables thousands of tie points and pass points to be automatically generated rather than manually generated as with analytical photogrammetry. Figure 4-7 shows a digital stereo photogrammetric workstation running software for photogrammetry and lidargrammetry, coupled with GIS software for real time display and analysis. If this looks similar to a typical desktop computer – that’s because it is similar, and that’s the main advantage, i.e., photogrammetric firms now use mass-produced computers with specialized photogrammetric software rather than purchasing expensive specialized hardware required during the analog and analytical eras. Simultaneous AT block adjustments are now performed with over 20,000 digital images per block of images and millions of auto-correlated pass points and tie points, rapidly and accurately providing the six exterior orientation parameters needed for each image (X/Y/Z coordinates of the lens focal point, and roll/pitch/yaw of the camera, when each image was taken). Automatic image correlation also enables the simplified generation of Digital Surface Models (DSMs) and the highly popular digital orthophotos produced by draping unrectified digital aerial imagery over a DSM or DEM. Digital photogrammetric software is also used in lidargrammetry discussed in Chapter 6 of this manual.
 Spectral Bands. With modern digital mapping cameras, multiple image products can be captured in a single flight, whereas film cameras are required to separately load different types of film. Figure 4-8 shows examples of panchromatic (grayscale), natural color (RGB) and color infrared (CIR) images, all acquired from the same digital camera in a single flight.
 Pan-Sharpened Imagery. In addition to using the three primary image products in their native form, an additional process called “pan-sharpening” can be applied to combine the higher- resolution panchromatic image with the corresponding lower-resolution natural color image to create a new, higher detail color image, as demonstrated with the example at Figure 4-9.

 Digital Mapping Camera (DMC). Z/I Imaging’s DMC has a strong customer base and is widely used throughout the U.S., especially for engineering applications. As of 2014, the latest model is the DMC IIe (see Figure 4-12) which includes five camera heads, one large format PAN camera using a single optics and single CCD and four multi-spectral cameras for RGB and NIR. Because of its 1.8 second frame rate and more than 14,000 pixel in flight direction (as well as cross-track), the Z/I DMC IIe can be operated at high airspeeds. For example, the user can collect data with 10cm GSD at 90% forward overlap and 150 knots airspeed. Using fixed wing aircraft, it can collect 3D stereo data from 2cm to 80cm GSD. The Z/I DMC IIe uses four MM30 SD storage modules, each with 1.2 TB capacity for a total storage of 4.8 TB (about 4300 image capacity).
 UltraCam. Microsoft has developed numerous large format digital frame cameras in recent years, the latest being the UltraCam Eagle shown at Figure 4-13. The UltraCam Eagle provides panchromatic and four multispectral bands (red/green/blue and near-infrared), supplying panchromatic images with GSD as small as 1.3 inches (3.25 cm) and color images with GSD of 3.8 inches (9.75 cm), acquired from an altitude of 500 meters, with final panchromatic images of 20,010 x 13,080 pixels or color images of 6,670 x 4,360 pixels. Post-processing of UltraCam imagery is performed with UltraMap and UM/AT extension. Photogrammetric production is performed with the customer’s photogrammetric production software or ortho production workflow by GXL Aerial.
 Flight Line Planning. Flight maps should be prepared by the contractor. Such maps are produced pre-flight with planned flight lines and photo centers. Figure 4-15 shows a flight diagram with 21 planned flight lines and photo-center coordinates for images to be acquired. Automated flight planning software computes flight parameters to ensure proper photo scale (or digital image GSD), end lap, side lap, terrain clearance and stereo coverage extending well beyond the project boundaries. With modern Flight Management Systems on acquisition aircraft, and an experienced crew, actual photo center coordinates (in the air) when acquired are often within 1 meter of pre- planned coordinates.
 Basic Control. The first step consists of establishing a network of basic control in the project area. This basic control consists of horizontal control monuments and benchmarks of vertical control that will serve as a reference framework for subsequent surveys. The basic control network is normally established using GPS surveys relative to CORS stations, with negligible positional errors, or to control monuments documented with NGS Data Sheet positional accuracy statements. Whereas NGS previously published Orders of Accuracy based on proportional accuracy statements (with orders AA, A and B being the most accurate), since the national adjustment of 2007, NGS has published the accuracy of the horizontal and ellipsoid height components of the National Spatial Reference System (NSRS) as a positional accuracy statement, e.g., 0.41 cm horizontal accuracy at the 95% confidence level per the example at Figure 4-16. Go to
 Photo Control. The second step involves establishing photo control by means of surveys originating from the basic control network of higher accuracy. Photo control points are photo- identifiable points that can be observed and measured on the aerial photograph and in a stereo model. Photo control points are the actual points appearing in the images, either pre-marked painted targets (Figure 4-17) or removable panels (Figure 4-18), or photo-identifiable points, as in Figures 4-19 and 4-20, that are surveyed relative to the basic control network and used to control photogrammetric operations.
 Photo-Identifiable Points. Figures 4-19 and 4-20 illustrate a good example of a point feature that is photo-identifiable at common image resolutions. Figure 4-19 shows how the 90- degree corner between trimmed grass and concrete provides a clear survey point for the GPS tripod and antenna used for photo control surveys; and Figure 4-20 shows how that 90-degree corner appears clearly on an image requiring photo-identifiable control. Photo-identifiable points can be established after commencement of aerial photography, especially if pre-marked targets or panels were obscured or disturbed at time of image acquisition. If not used for photo control, such photo-identifiable points are commonly used as QA/QC check points for accuracy testing.
 Control Point Location/Distribution. Figure 4-21 shows the location of nine “Von Gruber points” selected in the triple overlap areas of adjoining photographs when airborne GPS is not used to provide control. The number of control points and their optimum locations depend on whether or not direct georeferencing is used from airborne GPS recordings of X/Y/Z coordinates and inertial navigation system (INS) recording of angular orientation angles ω/φ/κ (roll, pitch, and heading) for each image. Prior to the use of direct georeferencing, it was common practice that each stereo pair of images should have three or four horizontal and vertical control points widely spaced in the corners of stereo models to cover overlapping flight lines. However, with modern digital cameras and direct georeferencing systems, as few as four control points may be adequate for an entire block of images in a single aerial triangulation. Automated image correlation of hundreds of tie points and pass points per stereo pair also helps to strengthen the aerial triangulation solution better than in the past when a high number of expensive control points were used. Care should be exercised to ensure that photo control points do not fall in shadowed areas.


 Airborne GPS Control. In most photomapping companies, it is now common to include ABGPS for recording the 3D (X/Y/Z) coordinates of the camera’s focal point, plus an inertial measurement unit (IMU) for recording the roll, pitch and yaw of the camera, when each photo/image is taken (see Figure 4-22). This is called direct georeferencing. When six exterior orientation parameters of each image (X/Y/Z and roll/pitch/yaw) are known, requirements for surveyed ground control are greatly reduced and the aerial triangulation process is simplified. With digital pushbroom cameras (e.g., ADS40/ADS80/ADS100 airborne digital sensors), ABGPS and IMU are mandatory but either or both are recommended for film or digital frame cameras such as the UltraCam or Digital Mapping Camera (DMC). Planning for ABGPS control includes consideration of the project area (size and site access for base stations); flight times and maximum allowable GPS baseline distance between GPS base stations and aircraft; basic photogrammetric and aerial triangulation requirements, including forward overlap between images and sidelap between flight lines; satellite availability during the collection period; location of suitable GPS base stations; location and number of ground GPS receivers required; data collection rate for the receivers; aircraft and ground crew logistics (base stations and aircraft receivers must use the same satellite configuration and limitations); calibration of antenna/ camera “lever arm” offset; ABGPS system cost; and experience of pilot, operator and post-processing personnel. Furthermore, back-up alternatives should be planned for in the event the ABGPS/IMU data are unusable. ABGPS receivers must be capable of tracking both coarse acquisition (C/A) and pseudo range (P-code) data. They must provide dual frequency (L1 and L2) and multi-channel capability with on-the-fly ambiguity resolution and be able to log GPS data at 1-second epochs or better. ABGPS is not necessarily less expensive than obtaining conventional ground control, though it is generally recognized that projects for 1”=100’ mapping with 2 foot contour accuracy or smaller can realize significant savings in time with the use of ABGPS. ABGPS technology usually provides maximum benefit for projects that can be accomplished in larger blocks of photography with multiple flight lines. This technology has been highly successful on USACE mapping projects to date.


 Index Maps. Aerial acquisition firms normally maintain multiple map indices. A spot or point index indicates the center of each aerial image along a flight line. A line index shows the paths or flight lines the airplane flew as it took images. A mosaic index shows all images used to create individual orthophoto tiles or photomosaic. Figure 4-15, above, showed a flight map with pre-planned flight lines and photo centers for Levy County, Florida. Figure 4-23 shows the actual flight lines, photo centers, and orthophoto tile index map of Levy County, following successful image acquisition. It shows individual images that will be used for pre-defined orthophoto tiles. This color-coded index map also shows the three different dates during which the imagery was acquired. The index map at Figure 4-23 enables the client to see how well the acquired numbered flight lines and image centers from airborne GPS compare with the planned flight lines and image centers at Figure 4-15.